这篇文章是Oracle Cloud系列文章的第一篇,主要介绍了以下内容:
1.Oracle Cloud的简介;
2.如何申请Oracle Cloud测试账户;
3.如何申请Ravello测试账户;
Author Archives: royalwzy
How to build an in-house Docker environment step by step?
主要内容:
1.环境准备;
2.安装并启动Docker;
3.部署私有Registry服务器;
4.安装并配置Rancher;
5.创建一个多容器的应用;
1.环境准备:
1.1 软件版本介绍:
1.OS:CentOS7.2/3.10.0-327.el7.x86_64(软件);
2.docker:1.11.2(软件);
3.rancher/server:v1.1.2(容器);
4.rancher/agent:v1.0.2(容器);
5.rancher/agent-instance:v0.8.3(容器);
6.registry:2.5.0(容器);
7.mysql:5.7.13(容器);
1.2 服务器准备:
1.Rancher服务器:192.168.10.160/rancher.htsec.com;用来安装Docker服务,Register服务,Rancher服务,Rancher代理和MySQL服务;
2.Container1服务器:192.168.10.161/container1.htsec.com;用来安装Docker服务,Rancher代理和创建容器;
3.Container2服务器:192.168.10.162/container2.htsec.com;用来安装Docker服务,Rancher代理和创建容器;
1.3 服务器配置:
# 分别设置hostname:
hostnamectl set-hostname rancher.htsec.com
hostnamectl set-hostname container1.htsec.com
hostnamectl set-hostname container2.htsec.com
# 分别关闭防火墙和网络管理服务:
systemctl stop firewalld.service
systemctl disable firewalld.service
systemctl stop NetworkManager.service
systemctl disable NetworkManager.service
# 分别配置/etc/hosts:
127.0.0.1 localhost localhost.localdomain localhost4 localhost4.localdomain4
::1 localhost localhost.localdomain localhost6 localhost6.localdomain6
192.168.10.160 rancher.htsec.com rancher
192.168.10.160 docker.htsec.com docker
192.168.10.160 registry.htsec.com registry
192.168.10.160 mysql.htsec.com mysql
192.168.10.161 container1.htsec.com container1
192.168.10.162 container2.htsec.com container2
1.4 下载Docker相关包(在可以连公网的机器下载,上传到内网服务器):
wget -S -c -r -np -L https://yum.dockerproject.org/repo/main/centos/7/;
mkdir -p /tools/docker/centos7
mv yum.dockerproject.org/repo/main/centos/7/* /tools/docker/centos7/
1.5 添加/etc/yum.repos.d/docker.repo文件,配置yum源;
[dockerrepo]
name=Docker Repository
baseurl=file:///tools/docker/centos7
enabled=1
gpgcheck=0
1.6 挂载操作系统光盘,添加/etc/yum.repos.d/centos.repo文件,配置yum源:
mkdir -p /tools/centos72
mount -o loop /dev/sr0 /tools/centos72
[centosrepo]
name=CentOS7 Repository
baseurl=file:///tools/centos72/
enabled=1
gpgcheck=0
1.7 生成YUM缓存:
yum clean all
yum makecache
2.分别安装并启动Docker:
2.1 必要条件:Docker必须安装在64位操作系统上,而且内核版本必须大于3.10;(CentOS7的内核版本最小是3.10,使用uname -r命令查看)
2.2 使用yum安装:
yum update -y
yum install -y docker-engine
2.3 如果直接使用rpm安装的话,需要先解决包依赖;
yum install -y libcgroup libtool-ltdl policycoreutils-python
rpm -ivh docker-engine-selinux-1.11.2-1.el7.centos.noarch.rpm
rpm -ivh docker-engine-1.11.2-1.el7.centos.x86_64.rpm
2.4 启动docker;
service docker start 或者 systemctl start docker.service
2.5 配置开机启动;
chkconfig docker on 或者 systemctl enable docker.service
3.部署私有Registry服务器:
3.1 加载registry容器(所以需要的容器都需要在其它环境下载,然后加载):
[root@rancher ~]# docker load < /tools/images/registry2.5.tar
[root@rancher ~]# docker images
REPOSITORY TAG IMAGE ID CREATED SIZE
registry latest c6c14b3960bd 5 days ago 33.28 MB
3.2 启动一个Registry,并把数据映射到本地卷:
[root@rancher ~]# mkdir -p /var/lib/registry
[root@rancher ~]# docker run -d -p 5000:5000 –restart=always –name registry -v /var/lib/registry:/var/lib/registry registry:latest
3.3 加载其它镜像:
[root@rancher ~]# docker load < /tools/images/rancherserver_v1.1.2.tar
[root@rancher ~]# docker load < /tools/images/rancheragent_v1.0.2.tar
[root@rancher ~]# docker load < /tools/images/rancheragent-instance_v0.8.3.tar
[root@rancher ~]# docker load < /tools/images/mysql5.7.13.tar
[root@rancher ~]# docker load < /tools/images/wordpress.tar
[root@rancher ~]# docker load < /tools/images/oraclelinux6.8.tar
[root@rancher ~]# docker load < /tools/images/hello-world.tar
[root@rancher ~]# docker images
REPOSITORY TAG IMAGE ID CREATED SIZE
wordpress latest 106a375e769a 46 hours ago 420.5 MB
registry latest c6c14b3960bd 5 days ago 33.28 MB
rancher/server latest ffe9c46b500a 11 days ago 842 MB
oraclelinux 6.8 175adfa05e40 13 days ago 223.1 MB
hello-world latest c54a2cc56cbb 4 weeks ago 1.848 kB
rancher/agent-instance v0.8.3 b6b013f2aa85 7 weeks ago 330.9 MB
rancher/agent v1.0.2 860ed2b2e8e3 7 weeks ago 454.3 MB
mysql latest 1195b21c3a45 7 weeks ago 380.2 MB
3.4 对镜像打标签,指向私有Registry:
[root@rancher ~]# docker tag registry:latest registry.htsec.com:5000/registry:2.5
[root@rancher ~]# docker tag rancher/server:latest registry.htsec.com:5000/rancher/server:v1.1.2
[root@rancher ~]# docker tag rancher/agent:v1.0.2 registry.htsec.com:5000/rancher/agent:v1.0.2
[root@rancher ~]# docker tag rancher/agent-instance:v0.8.3 registry.htsec.com:5000/rancher/agent-instance:v0.8.3
[root@rancher ~]# docker tag mysql:latest registry.htsec.com:5000/mysql:5.7.13
[root@rancher ~]# docker tag wordpress:latest registry.htsec.com:5000/wordpress:4.5.3
[root@rancher ~]# docker tag oraclelinux:6.8 registry.htsec.com:5000/oraclelinux:6.8
[root@rancher ~]# docker tag hello-world:latest registry.htsec.com:5000/hello-world:latest
3.5 把镜像推到私有Registry中:
[root@rancher ~]# docker push registry.htsec.com:5000/registry:2.5
[root@rancher ~]# docker push registry.htsec.com:5000/rancher/server:v1.1.2
[root@rancher ~]# docker push registry.htsec.com:5000/rancher/agent:v1.0.2
[root@rancher ~]# docker push registry.htsec.com:5000/rancher/agent-instance:v0.8.3
[root@rancher ~]# docker push registry.htsec.com:5000/mysql:5.7.13
[root@rancher ~]# docker push registry.htsec.com:5000/wordpress:4.5.3
[root@rancher ~]# docker push registry.htsec.com:5000/oraclelinux:6.8
[root@rancher ~]# docker push registry.htsec.com:5000/hello-world:latest
3.6 从私有Registry中拉取镜像:
[root@rancher ~]# docker pull registry.htsec.com:5000/registry:2.5
[root@rancher ~]# docker pull registry.htsec.com:5000/rancher/server:v1.1.2
[root@rancher ~]# docker pull registry.htsec.com:5000/rancher/agent:v1.0.2
[root@rancher ~]# docker pull registry.htsec.com:5000/rancher/agent-instance:v0.8.3
[root@rancher ~]# docker pull registry.htsec.com:5000/mysql:5.7.13
[root@rancher ~]# docker pull registry.htsec.com:5000/wordpress:4.5.3
[root@rancher ~]# docker pull registry.htsec.com:5000/oraclelinux:6.8
[root@rancher ~]# docker pull registry.htsec.com:5000/hello-world:latest
3.7 将本地的镜像删掉(untag):
[root@rancher ~]# docker rmi registry:latest
[root@rancher ~]# docker rmi rancher/server:latest
[root@rancher ~]# docker rmi rancher/agent:v1.0.2
[root@rancher ~]# docker rmi rancher/agent-instance:v0.8.3
[root@rancher ~]# docker rmi mysql:latest
[root@rancher ~]# docker rmi wordpress:latest
[root@rancher ~]# docker rmi oraclelinux:6.8
[root@rancher ~]# docker rmi hello-world:latest
[root@rancher ~]# docker images
REPOSITORY TAG IMAGE ID CREATED SIZE
registry.htsec.com:5000/wordpress 4.5.3 106a375e769a 47 hours ago 420.5 MB
registry.htsec.com:5000/registry 2.5 c6c14b3960bd 5 days ago 33.28 MB
registry.htsec.com:5000/rancher/server v1.1.2 ffe9c46b500a 11 days ago 842 MB
registry.htsec.com:5000/oraclelinux 6.8 175adfa05e40 2 weeks ago 223.1 MB
registry.htsec.com:5000/hello-world latest c54a2cc56cbb 4 weeks ago 1.848 kB
registry.htsec.com:5000/rancher/agent-instance v0.8.3 b6b013f2aa85 7 weeks ago 330.9 MB
registry.htsec.com:5000/rancher/agent v1.0.2 860ed2b2e8e3 7 weeks ago 454.3 MB
registry.htsec.com:5000/mysql 5.7.13 1195b21c3a45 7 weeks ago 380.2 MB
3.8 在私有Registry中检索镜像,不能使用docker search命令,需要通过使用v2版本的API:
[root@rancher ~]# docker search registry.htsec.com:5000/rancher/server
Error response from daemon: Unexpected status code 404
[root@rancher ~]# curl http://registry.htsec.com:5000/v2/_catalog
{“repositories”:[“hello-world”,”mysql”,”oraclelinux”,”rancher/agent”,”rancher/agent-instance”,”rancher/server”,”registry”,”wordpress”]}
[root@rancher ~]# curl http://registry.htsec.com:5000/v2/rancher/server/tags/list
{“name”:”rancher/server”,”tags”:[“v1.1.2”]}
4.安装并配置Rancher:
4.1 启动并配置MySQL容器:
# 启动MySQL容器;
[root@rancher ~]# mkdir -p /var/lib/mysql
[root@rancher ~]# docker run -d –restart=always –name mysql -v /var/lib/mysql:/var/lib/mysql -e MYSQL_ROOT_PASSWORD=pwd registry.htsec.com:5000/mysql:5.7.13
# 配置MySQL容器;
[root@rancher ~]# docker exec -it mysql /bin/bash
root@c94ee0fabd33:/# mysql -uroot -p
mysql> CREATE DATABASE IF NOT EXISTS cattle COLLATE = ‘utf8_general_ci’ CHARACTER SET = ‘utf8’;
mysql> GRANT ALL ON cattle.* TO ‘cattle’@’%’ IDENTIFIED BY ‘cattle’;
mysql> GRANT ALL ON cattle.* TO ‘cattle’@’localhost’ IDENTIFIED BY ‘cattle’;
mysql> flush privileges;
mysql> exit
root@c94ee0fabd33:/# exit
4.2 启动rancher/server容器(Rancher的三个组件[rancher/server,rancher/agent,rancher/agent-instance]的版本是有关联的):
[root@rancher ~]# docker run -d –restart=always -p 8080:8080 –name rancher-server –link mysql:mysql \
-e CATTLE_BOOTSTRAP_REQUIRED_IMAGE=registry.htsec.com:5000/rancher/agent:v1.0.2 \
-e CATTLE_AGENT_INSTANCE_IMAGE=registry.htsec.com:5000/rancher/agent-instance:v0.8.3 \
registry.htsec.com:5000/rancher/server:v1.1.2
# 打开浏览器测试;
http://192.168.10.160:8080
4.3 添加hosts:
# 在管理服务器上运行;
[root@rancher ~]# sudo docker run -e CATTLE_AGENT_IP=”192.168.10.160″ -e CATTLE_HOST_LABELS=’role=administrator&id=010505′ -d –privileged -v /var/run/docker.sock:/var/run/docker.sock -v /var/lib/rancher:/var/lib/rancher registry.htsec.com:5000/rancher/agent:v1.0.2 http://192.168.10.160:8080/v1/scripts/2D061F6830FEC5A215F3:1470247200000:kz7K8gpchOMXD8poxh3kglKEBsc
# 在容器服务器上运行;
[root@container1 ~]# sudo docker run -e CATTLE_AGENT_IP=”192.168.10.161″ -e CATTLE_HOST_LABELS=’role=owner’ -d –privileged -v /var/run/docker.sock:/var/run/docker.sock -v /var/lib/rancher:/var/lib/rancher registry.htsec.com:5000/rancher/agent:v1.0.2 http://192.168.10.160:8080/v1/scripts/2D061F6830FEC5A215F3:1470247200000:kz7K8gpchOMXD8poxh3kglKEBsc
[root@container2 ~]# sudo docker run -e CATTLE_AGENT_IP=”192.168.10.162″ -e CATTLE_HOST_LABELS=’role=owner’ -d –privileged -v /var/run/docker.sock:/var/run/docker.sock -v /var/lib/rancher:/var/lib/rancher registry.htsec.com:5000/rancher/agent:v1.0.2 http://192.168.10.160:8080/v1/scripts/2D061F6830FEC5A215F3:1470247200000:kz7K8gpchOMXD8poxh3kglKEBsc
4.4 查看拓扑图:
5.创建一个多容器的应用:
5.1 创建一个Stacks:名叫WordPress;
5.2 添加一个Service(wp-mysql),由一个[registry.htsec.com:5000/mysql:5.7.13]镜像创建的容器组成,需要做端口转换(因为客户端可能在其它的主机上),并指定MYSQL_ROOT_PASSWORD环境变量;
5.2 添加一个Service(wp-app),由两个[registry.htsec.com:5000/wordpress:4.5.3]镜像创建的容器组成,链接到wp-mysql服务,并指定服务别名;
5.3 添加一个Service(wp-lb),由一个负载均衡器容器组成,映射80端口到8000端口,并链接到wp-app服务上;
5.4 访问负载均衡器的8000端口:http://192.168.10.162:8000/;
问题:[root@rancher ~]# docker push registry.htsec.com:5000/registry:2.5
The push refers to a repository [registry.htsec.com:5000/registry]
Get https://registry.htsec.com:5000/v1/_ping: tls: oversized record received with length 20527
解决办法:
1.添加文件:
[root@rancher ~]# vi /etc/sysconfig/docker
DOCKER_OPTS=”–insecure-registry registry.htsec.com:5000″
2.修改文件:
[root@rancher ~]# vi /lib/systemd/system/docker.service
[Unit]
Description=Docker Application Container Engine
Documentation=https://docs.docker.com
After=network.target docker.socket
Requires=docker.socket
[Service]
Type=notify
# the default is not to use systemd for cgroups because the delegate issues still
# exists and systemd currently does not support the cgroup feature set required
# for containers run by docker
EnvironmentFile=-/etc/sysconfig/docker
ExecStart=/usr/bin/docker daemon $DOCKER_OPTS -H fd://
MountFlags=slave
LimitNOFILE=1048576
LimitNPROC=1048576
LimitCORE=infinity
TimeoutStartSec=0
# set delegate yes so that systemd does not reset the cgroups of docker containers
Delegate=yes
[Install]
WantedBy=multi-user.target
3.重启Docker:
[root@rancher ~]# systemctl daemon-reload
[root@rancher ~]# systemctl stop docker.service
[root@rancher ~]# systemctl start docker.service
问题:WARNING: IPv4 forwarding is disabled. Networking will not work.
解决办法:
1.在/usr/lib/sysctl.d/00-system.conf配置文件中添加代码;
net.ipv4.ip_forward=1
2.重启network服务;
systemctl restart network
3.查看是否修改成功;
sysctl net.ipv4.ip_forward
Docker环境安装及配置
1.实验环境:
1.1 虚拟机:VirtualBox 4.3;
1.2 操作系统:CentOS7.2/3.10.0-327.el7.x86_64;
1.3 服务器名:docker.htsec.com;
1.4 IP:192.168.10.100(内网IP)/10.0.2.15(外网IP);
2.下载docker的rpm包,并配置YUM源:
2.1 下载docker的yum包:wget -S -c -r -np -L https://yum.dockerproject.org/repo/main/centos/7/;
2.2 修改目录:
mkdir -p /tools/docker/centos7
mv yum.dockerproject.org/repo/main/centos/7/* /tools/docker/centos7/
2.3 添加/etc/yum.repos.d/docker.repo文件,配置yum源;
[dockerrepo]
name=Docker Repository
baseurl=file:///tools/docker/centos7
enabled=1
gpgcheck=0
3.添加CentOS操作系统的YUM源:
3.1 挂载光盘并把内容拷贝至/tools/centos72/目录;
3.2 添加/etc/yum.repos.d/centos.repo文件,配置yum源;
[centosrepo]
name=CentOS7 Repository
baseurl=file:///tools/centos72/
enabled=1
gpgcheck=0
3.3 创建yum缓存:
yum clean all
yum makecache
4.安装并启动docker:
4.1 必要条件:Docker必须安装在64位操作系统上,而且内核版本必须大于3.10;(CentOS7的内核版本最小是3.10,使用uname -r命令查看)
4.2 使用yum安装:如果服务器可以访问外网,则可以直接配置指向官方的YUM源;n在企业内部一般会构建私有的YUM源;
yum update -y
yum install -y docker-engine
4.3 如果直接使用rpm安装的话,需要先解决包依赖;
yum -y install libcgroup libtool-ltdl policycoreutils-python
rpm -ivh docker-engine-selinux-1.11.2-1.el7.centos.noarch.rpm
rpm -ivh docker-engine-1.11.2-1.el7.centos.x86_64.rpm
4.4 启动docker;
service docker start 或者 /bin/systemctl start docker.service
4.5 配置开机启动;
chkconfig docker on 或者 systemctl enable docker.service
5.验证docker是否安装成功;
[root@docker ~]# docker run hello-world
Unable to find image ‘hello-world:latest’ locally
latest: Pulling from library/hello-world
c04b14da8d14: Pull complete
Digest: sha256:0256e8a36e2070f7bf2d0b0763dbabdd67798512411de4cdcf9431a1feb60fd9
Status: Downloaded newer image for hello-world:latest
WARNING: IPv4 forwarding is disabled. Networking will not work.
Hello from Docker!
This message shows that your installation appears to be working correctly.
To generate this message, Docker took the following steps:
1. The Docker client contacted the Docker daemon.
2. The Docker daemon pulled the “hello-world” image from the Docker Hub.
3. The Docker daemon created a new container from that image which runs the
executable that produces the output you are currently reading.
4. The Docker daemon streamed that output to the Docker client, which sent it
to your terminal.
To try something more ambitious, you can run an Ubuntu container with:
$ docker run -it ubuntu bash
Share images, automate workflows, and more with a free Docker Hub account:
https://hub.docker.com
For more examples and ideas, visit:
问题:WARNING: IPv4 forwarding is disabled. Networking will not work.
解决办法:
1.在/usr/lib/sysctl.d/00-system.conf配置文件中添加代码;
net.ipv4.ip_forward=1
2.重启network服务;
systemctl restart network
3.查看是否修改成功;
sysctl net.ipv4.ip_forward
构建openstack YUM源(openstack-kilo on centos7)
构建openstack YUM源(openstack-kilo on centos7)
1.对于企业的openstack私有云,出于安全和某些因素的考虑,有些服务器无法访问公网,导致服务器无法更新某些RPM包,同时内部常有openstack新特性开发需求,版本的维护与升级,因此非常有必要构建企业私有的openstack YUM源;
1.1构建openstack YUM源有两个步骤:
1.同步(下载)官方的源至企业yum服务器中;
2.重新创建repo并通过nginx(apache)发布;
1.2设置用户名:
hostnamectl set-hostname cloud.htsec.com;
1.3修改/etc/sysconfig/network-scripts/ifcfg-enp0s3文件来设置静态IP:
TYPE=Ethernet #网络类型
DEVICE=enp0s3 #网卡地址代号/子代号
ONBOOT=yes #开机运行
BOOTPROTO=static #使用协议(静态)
IPADDR=192.168.10.200 #IP地址
NETMASK=255.255.255.0 #子网掩码
GATEWAY=192.168.10.1 #网关
HWADDR=00:16:3E:89:85:38 #MAC地址
BROADCAST=216.18.194.199 #广播地址
DNS1=8.8.8.8 #域名解析服务器1
DNS2=8.8.4.4 #域名解析服务器2
1.4手动修改/etc/hosts文件:
192.168.10.200 cloud.htsec.com cloud
1.5禁用selinux:
setenforce 0
1.6关闭防火墙:
systemctl stop firewalld.service
systemctl disable firewalld.service
systemctl status firewalld.service
1.7关闭网络管理:
service NetManager stop
1.8配置每个节点的公钥访问;
1.9配置NTP服务器;
2.YUM源下载:
2.1安装openstack需要用到8个repo,分两类:
1.Centos源:CentOS-Base.repo,CentOS-Debuginfo.repo,CentOS-Media.repo,CentOS-Vault.repo;
2.openstack源及相关依赖源(epel,foreman,puppet):epel.repo,foreman.repo,puppetlabs.repo,rdo-release.repo;
2.2openstack源地址:
1.所有版本的openstack源:https://repos.fedorapeople.org/repos/openstack/
2.openstack-kilo版本源:https://repos.fedorapeople.org/repos/openstack/openstack-kilo/
2.3下载openstack-kilo源:
wget -S -c -r -np -L https://repos.fedorapeople.org/repos/openstack/openstack-kilo/
wget -S -c -r -np -L https://repos.fedorapeople.org/repos/openstack/openstack-juno/
2.4下载epel源:
wget -S -c -r -np -L http://mirrors.yun-idc.com/epel/7/
2.5下载puppetlabs源:
wget -S -c -r -np -L https://yum.puppetlabs.com/el/7/
2.6下载foreman源:
wget -S -c -r -np -L http://yum.theforeman.org/plugins/1.10/el7/
wget -S -c -r -np -L http://yum.theforeman.org/releases/1.10/el7/
2.7下载nginx:
wget -S -c -r -np -L http://nginx.org/packages/centos/7/
2.8CentOS的源可以通过国内的镜像下载:
wget -S -c -r -np -L http://mirrors.sohu.com/centos/7
2.9调整目录结构:
2.9.1创建新的目录:
mkdir -p openstack-kilo openstack-juno epel puppetlabs foreman centos nginx;
2.9.2移动文件:
mv repos.fedorapeople.org/repos/openstack/openstack-kilo/* openstack-kilo/;
mv repos.fedorapeople.org/repos/openstack/openstack-juno/* openstack-juno/;
mv mirrors.yun-idc.com/epel/* epel/;
mv yum.puppetlabs.com/el/* puppetlabs/;
mv yum.theforeman.org/plugins foreman/;
mv yum.theforeman.org/releases foreman/;
mv mirrors.sohu.com/centos/* centos/
mv nginx.org/packages/centos/ nginx/
2.9.3删除不需要的软件包和文件:
find ./ -name index.html* -exec rm -rf {} \;
find ./ -name fedora-* -exec rm -rf {} \;
rm -rf repos.fedorapeople.org/
rm -rf mirrors.yun-idc.com/
rm -rf yum.puppetlabs.com/
rm -rf yum.theforeman.org/
rm -rf mirrors.sohu.com/
rm -rf nginx.org/
3.Nginx配置:
3.1安装nginx rpm包:
rpm -ivh /openstack/nginx/centos/7/noarch/RPMS/nginx-release-centos-7-0.el7.ngx.noarch.rpm
3.2修改/etc/yum.repos.d/nginx.repo文件,把yum源指向本地;
[nginx]
name=nginx repo
baseurl=file:///openstack/nginx/centos/7/x86_64
gpgcheck=0
enabled=1
3.3安装nginx:yum install -y nginx;
3.4修改/etc/nginx/conf.d/default.conf文件配置nginx:
server {
listen 80;
server_name cloud.htsec.com;
#charset koi8-r;
#access_log /var/log/nginx/log/host.access.log main;
location / {
#root /usr/share/nginx/html;
root /openstack;
autoindex on;
index index.html index.htm;
}
#error_page 404 /404.html;
# redirect server error pages to the static page /50x.html
#
error_page 500 502 503 504 /50x.html;
location = /50x.html {
root /usr/share/nginx/html;
}
# proxy the PHP scripts to Apache listening on 127.0.0.1:80
#
#location ~ \.php$ {
# proxy_pass http://127.0.0.1;
#}
# pass the PHP scripts to FastCGI server listening on 127.0.0.1:9000
#
#location ~ \.php$ {
# root html;
# fastcgi_pass 127.0.0.1:9000;
# fastcgi_index index.php;
# fastcgi_param SCRIPT_FILENAME /scripts$fastcgi_script_name;
# include fastcgi_params;
#}
# deny access to .htaccess files, if Apache’s document root
# concurs with nginx’s one
#
#location ~ /\.ht {
# deny all;
#}
}
3.5服务重启:
systemctl enable nginx
systemctl start nginx
systemctl check nginx
4.制作rdo-release.rpm:
4.1下载rdo-release-kilo-1.src.rpm源码包:
[root@cloud ~]# wget http://cloud.htsec.com/openstack-kilo/rdo-release-kilo-1.src.rpm
4.2创建alan用户和组:
useradd alan;
4.3解压rpm包,会在~目录生成一个rpmbuild目录(其中SOURCE目录下存放repo文件,SPECS目录下存放spec文件):
rpm -i rdo-release-kilo-1.src.rpm;
4.4修改并添加repo文件:
vi rdo-release.repo
[openstack-kilo]
name=OpenStack Kilo Repository
baseurl=http://cloud.htsec.com/openstack-kilo/el7/
skip_if_unavailable=0
enabled=1
gpgcheck=1
gpgkey=file:///etc/pki/rpm-gpg/RPM-GPG-KEY-RDO-kilo
vi rdo-testing.repo
[openstack-kilo-testing]
name=OpenStack Kilo Testing
baseurl=http://cloud.htsec.com/openstack-kilo/testing/el7
skip_if_unavailable=0
gpgcheck=0
enabled=0
vi epel.repo
[epel]
name=EPEL Repository
baseurl=http://cloud.htsec.com/epel/7/x86_64
skip_if_unavailable=0
enabled=1
gpgcheck=0
vi foreman.repo
[foreman-releases]
name=Foreman Releases Repository
baseurl=http://cloud.htsec.com/foreman/releases/1.10/el7/x86_64
enabled=1
gpgcheck=0
[foreman-releases-source]
name=Foreman Releases Source Repository
baseurl=http://cloud.htsec.com/foreman/releases/1.10/el7/source
enabled=1
gpgcheck=0
[foreman-plugins]
name=Foreman Plugins Repository
baseurl=http://cloud.htsec.com/foreman/plugins/1.10/el7/x86_64
enabled=1
gpgcheck=0
[foreman-plugins-source]
name=Foreman Plugins Source Repository
baseurl=http://cloud.htsec.com/foreman/plugins/1.10/el7/source
enabled=1
gpgcheck=0
vi puppetlabs.repo
[puppetlabs-products]
name=Puppet Labs Products
baseurl=http://cloud.htsec.com/puppetlabs/7/products/x86_64
enabled=1
gpgcheck=0
[puppetlabs-deps]
name=Puppet Labs Dependencies
baseurl=http://cloud.htsec.com/puppetlabs/7/dependencies/x86_64
enabled=1
gpgcheck=0
[puppetlabs-devel]
name=Puppet Labs Devel
baseurl=http://cloud.htsec.com/puppetlabs/7/devel/x86_64
enabled=1
gpgcheck=0
vi centos.repo
[base]
name=CentOS7 Base Repository
baseurl=http://cloud.htsec.com/centos/7/os/x86_64
enabled=1
gpgcheck=0
[updates]
name=CentOS7 Updates Repository
baseurl=http://cloud.htsec.com/centos/7/updates/x86_64
enabled=1
gpgcheck=0
[extras]
name=CentOS7 Extras Repository
baseurl=http://cloud.htsec.com/centos/7/extras/x86_64/
enabled=1
gpgcheck=0
[centosplus]
name=CentOS7 Plus Repository
baseurl=http://cloud.htsec.com/centos/7/centosplus/x86_64/
enabled=1
gpgcheck=0
4.5修改.spec文件内容:
vi rdo-release.spec
Name: rdo-release
Version: kilo
Release: 1
Summary: RDO repository configuration
Group: System Environment/Base
License: Apache2
URL: https://github.com/redhat-openstack/rdo-release
Source0: rdo-release.repo
Source2: rdo-testing.repo
Source1: RPM-GPG-KEY-RDO-kilo
Source3: epel.repo
Source4: foreman.repo
Source5: puppetlabs.repo
Source6: centos.repo
Source7: RPM-GPG-KEY-CentOS-7
BuildArch: noarch
%description
This package contains the RDO repository
%install
install -p -d %{buildroot}%{_sysconfdir}/yum.repos.d
install -p -m 644 %{SOURCE0} %{buildroot}%{_sysconfdir}/yum.repos.d
install -p -m 644 %{SOURCE2} %{buildroot}%{_sysconfdir}/yum.repos.d
install -p -m 644 %{SOURCE3} %{buildroot}%{_sysconfdir}/yum.repos.d
install -p -m 644 %{SOURCE4} %{buildroot}%{_sysconfdir}/yum.repos.d
install -p -m 644 %{SOURCE5} %{buildroot}%{_sysconfdir}/yum.repos.d
install -p -m 644 %{SOURCE6} %{buildroot}%{_sysconfdir}/yum.repos.d
#GPG Keys
install -p -d %{buildroot}%{_sysconfdir}/pki/rpm-gpg
install -Dpm 644 %{SOURCE1} %{buildroot}%{_sysconfdir}/pki/rpm-gpg
install -Dpm 644 %{SOURCE7} %{buildroot}%{_sysconfdir}/pki/rpm-gpg
%files
%{_sysconfdir}/yum.repos.d/*.repo
%{_sysconfdir}/pki/rpm-gpg/RPM-GPG-KEY-*
%post
# Adjust repos as per dist and version
source /etc/os-release
DIST=$ID
RELEASEVER=$VERSION_ID
if [ “$DIST” != ‘fedora’ ]; then
DIST=el
FDIST=el
# $releasever doesn’t seem to be a reliable way to get the major version on RHEL
# e.g. if distroverpkg isn’t present in yum.conf mine was set to 6Server
# because this was the version of the package redhat-release-server-6Server
RELEASEVER=$(sed -e ‘s/.*release \([0-9]\+\).*/\1/’ /etc/system-release)
else
FDIST=f
fi
for repo in rdo-release rdo-testing epel foreman puppetlabs centos ; do
for var in DIST FDIST RELEASEVER; do
sed -i -e “s/%$var%/$(eval echo \$$var)/g” %{_sysconfdir}/yum.repos.d/$repo.repo
done
done
4.6重新打包rpm:
[root@cloud ~]# rpmbuild -ba rpmbuild/SPECS/rdo-release.spec
4.7把生成的rpm放到指定的目录:
[root@cloud ~]# mv /root/rpmbuild/RPMS/noarch/rdo-release-kilo-1.noarch.rpm /openstack/openstack-kilo/rdo-release-kilo-1-ht.noarch.rpm
[root@cloud ~]# mv /root/rpmbuild/SRPMS/rdo-release-kilo-1.src.rpm /openstack/openstack-kilo/rdo-release-kilo-1-ht.src.rpm
5.安装openstack-kilo:
wget http://cloud.htsec.com/openstack-kilo/rdo-release-kilo-1-ht.noarch.rpm
rpm -ivh rdo-release-kilo-1-ht.noarch.rpm –replacefiles
yum update -y
yum install -y openstack-packstack
packstack –allinone
在VirtualBox中安装Oracle 12c RAC
1.实验环境:
1.OS:Oracle Linux Server release 6.6;
2.Oracle:12.1.0.2.0;
3.Node1:
1.hostname:node1.oracle.com;
2.public ip:192.168.10.170(eth0);
3.private ip:191.168.20.170(eth1);
4.virtual ip:192.168.10.173;
4.Node2:
1.hostname:node2.oracle.com;
2.public ip:192.168.10.171(eth0);
3.private ip:191.168.20.171(eth1);
4.virtual ip:192.168.10.174;
5.SCAN IP:192.168.10.177/192.168.10.178/192.168.10.179;
2.配置网络环境,安装软件包并调整服务器的时间和参数:
1.设置服务器名:hostname;
2.修改/etc/hosts,/etc/sysconfig/network;
3.使用ntp服务器保持时间同步;
4.设置IP地址;
5.配置DNS服务器,并修改/etc/resolv.conf配置文件;
6.安装软件包:yum -y install binutils* compat-lib* gcc* glibc* ksh make* sysstat* unixODBC* libgcc* libstdc++* libaio* libXext* libXtst* libX11* libXau* libxcb* libXi*;
7.分别修改/etc/sysctl.conf文件;
8.分别修改/etc/security/limits.conf文件;
9.修改/etc/pam.d/login文件;
10.创建grid和oracle用户及添加相应的环境变量;
11.关闭防火墙和SELinux;
3.使用udev创建共享磁盘;
4.安装GI;
1.解压软件;
2.安装cvu相关rpm包:rpm -ivh /tools/grid/rpm/cvuqdisk-1.0.9-1.rpm;
3.安装前校验:/tools/grid/runcluvfy.sh stage -pre crsinst -n node1,node2 -verbose;
4.最后检查资源状态:crsctl stat res -t;
5.使用asmca命令创建磁盘组;
1.创建GI的时候已经创建了CRS磁盘组;
2.创建DATA磁盘组;
3.创建FRA磁盘组;
6.安装数据库软件;
7.安装数据库;
1.查看资源状态:crsctl stat res -t;
2.查看RAC数据库配置信息:srvctl config database -d ORCL/srvctl status database -d ORCL/srvctl status listener;
———————– 网络配置 ———————–
— 修改主机名;
hostname node1.oracle.com
hostname node2.oracle.com
— 修改/etc/hosts;
127.0.0.1 localhost localhost.localdomain localhost4 localhost4.localdomain4
::1 localhost localhost.localdomain localhost6 localhost6.localdomain6
# Public IP
192.168.10.170 node1.oracle.com node1
192.168.10.171 node2.oracle.com node2
# Private IP
192.168.20.170 node1-pri.oracle.com node1-pri
192.168.20.171 node2-pri.oracle.com node2-pri
# VIP
192.168.10.172 node1-vip.oracle.com node1-vip
192.168.10.173 node2-vip.oracle.com node2-vip
# Scan IP
192.168.10.177 rac-cluster-scan.oracle.com rac-cluster-scan
#192.168.10.178 rac-cluster-scan.oracle.com rac-cluster-scan
#192.168.10.179 rac-cluster-scan.oracle.com rac-cluster-scan
# DNS Server
#192.168.10.180 rac-dns.oracle.com rac-dns
— 修改/etc/sysconfig/network;
HOSTNAME=node1.oracle.com
HOSTNAME=node2.oracle.com
———————– 网络配置 ———————–
———————– 系统参数 ———————–
— 修改/etc/sysctl.conf文件;
fs.file-max = 6815744
kernel.sem = 250 32000 100 128
kernel.shmmni = 4096
kernel.shmall = 1073741824
kernel.shmmax = 4398046511104
net.core.rmem_default = 262144
net.core.rmem_max = 4194304
net.core.wmem_default = 262144
net.core.wmem_max = 1048576
fs.aio-max-nr = 1048576
net.ipv4.ip_local_port_range = 9000 65500
> sysctl -p;
— 修改/etc/security/limits.conf文件;
grid soft nproc 2047
grid hard nproc 16384
grid soft nofile 4096
grid hard nofile 65536
oracle soft nproc 2047
oracle hard nproc 16384
oracle soft nofile 4096
oracle hard nofile 65536
— 修改/etc/pam.d/login文件;
session required /lib/security/pam_limits.so
session required pam_limits.so
———————– 系统参数 ———————–
———————– 创建用户 ———————–
— 创建用户组;
groupadd -g 10001 oinstall
groupadd -g 10002 dba
groupadd -g 10003 oper
groupadd -g 10004 backupdba
groupadd -g 10005 dgdba
groupadd -g 10006 kmdba
groupadd -g 10007 asmdba
groupadd -g 10008 asmoper
groupadd -g 10009 asmadmin
— 创建用户;
useradd -u 10000 -g oinstall -G dba,oper,asmdba,backupdba,dgdba,kmdba oracle;
useradd -u 10001 -g oinstall -G dba,asmdba,asmoper,asmadmin grid;
— 创建软件目录;
mkdir -p /u01/app/grid;
mkdir -p /u01/app/12.1.0/grid;
mkdir -p /u01/app/oracle/product/12.1.0/db_1;
chown -R grid:oinstall /u01;
chown -R oracle:oinstall /u01/app/oracle;
chmod -R 775 /u01;
— 设置grid用户的环境变量.bash_profile
ORACLE_HOSTNAME=node1.oracle.com
ORACLE_SID=+ASM1
ORACLE_BASE=/u01/app/grid
ORACLE_HOME=/u01/app/12.1.0/grid
PATH=$ORACLE_HOME/bin:/usr/sbin:$PATH
LD_LIBRARY_PATH=$ORACLE_HOME/lib:/usr/lib:/lib
CLASSPATH=$ORACLE_HOME/JRE:$ORACLE_HOME/jlib:$ORACLE_HOME/rdbms/jlib
export ORACLE_HOSTNAME ORACLE_SID ORACLE_BASE ORACLE_HOME PATH LD_LIBRARY_PATH CLASSPATH
alias sqlplus=’rlwrap sqlplus’
— 设置oracle用户的环境变量.bash_profile
ORACLE_HOSTNAME=node1.oracle.com
ORACLE_SID=ORCL1
ORACLE_UNQNAME=ORCL
ORACLE_BASE=/u01/app/oracle
ORACLE_HOME=$ORACLE_BASE/product/12.1.0/db_1
PATH=$ORACLE_HOME/bin:/usr/sbin:$PATH
LD_LIBRARY_PATH=$ORACLE_HOME/lib:/lib:/usr/lib
CLASSPATH=$ORACLE_HOME/JRE:$ORACLE_HOME/jlib:$ORACLE_HOME/rdbms/jlib
export ORACLE_HOSTNAME ORACLE_SID ORACLE_UNQNAME ORACLE_BASE ORACLE_HOME PATH LD_LIBRARY_PATH CLASSPATH
alias sqlplus=’rlwrap sqlplus’
———————– 创建用户 ———————–
———————– 创建共享磁盘 ———————–
— 在一个虚拟机中创建[固定大小]的虚拟磁盘;
— 然后在[管理]->[虚拟介质管理]界面,修虚拟磁盘的类型为[可共享];
— 添加到另外的虚拟机中;
———————– 创建共享磁盘 ———————–
———————– 使用udev配置共享磁盘 ———————–
— 生成udev规则文件的脚本;
for i in a b c d e f g h i j k l m n o p q r s t u v w x y z
do
echo “KERNEL==\”sd*\”, BUS==\”scsi\”, PROGRAM==\”/sbin/scsi_id –whitelisted –replace-whitespace –device=/dev/\$name\”, RESULT==\”`/sbin/scsi_id –whitelisted –replace-whitespace –device=/dev/sd$i`\”, NAME=\”asm-disk$i\”, OWNER=\”grid\”, GROUP=\”asmadmin\”, MODE=\”0660\””
done
— 检查是否安装udev;
rpm -qa | grep udev
— 添加规则文件vi /etc/udev/rules.d/99-oracle-asmdevices.rules;(内容可以通过脚本生成)
KERNEL==”sd*”, BUS==”scsi”, PROGRAM==”/sbin/scsi_id –whitelisted –replace-whitespace –device=/dev/$name”, RESULT==”1ATA_VBOX_HARDDISK_VBab81d7dc-431ca37f”, NAME=”asm-crs”, OWNER=”grid”, GROUP=”asmadmin”, MODE=”0660″
KERNEL==”sd*”, BUS==”scsi”, PROGRAM==”/sbin/scsi_id –whitelisted –replace-whitespace –device=/dev/$name”, RESULT==”1ATA_VBOX_HARDDISK_VBe8fa478f-cd38bd32″, NAME=”asm-data1″, OWNER=”grid”, GROUP=”asmadmin”, MODE=”0660″
KERNEL==”sd*”, BUS==”scsi”, PROGRAM==”/sbin/scsi_id –whitelisted –replace-whitespace –device=/dev/$name”, RESULT==”1ATA_VBOX_HARDDISK_VB57dac3e5-ff6636ce”, NAME=”asm-data2″, OWNER=”grid”, GROUP=”asmadmin”, MODE=”0660″
KERNEL==”sd*”, BUS==”scsi”, PROGRAM==”/sbin/scsi_id –whitelisted –replace-whitespace –device=/dev/$name”, RESULT==”1ATA_VBOX_HARDDISK_VB04158991-1baaa75c”, NAME=”asm-data3″, OWNER=”grid”, GROUP=”asmadmin”, MODE=”0660″
KERNEL==”sd*”, BUS==”scsi”, PROGRAM==”/sbin/scsi_id –whitelisted –replace-whitespace –device=/dev/$name”, RESULT==”1ATA_VBOX_HARDDISK_VB389c5a94-92168d11″, NAME=”asm-fra1″, OWNER=”grid”, GROUP=”asmadmin”, MODE=”0660″
KERNEL==”sd*”, BUS==”scsi”, PROGRAM==”/sbin/scsi_id –whitelisted –replace-whitespace –device=/dev/$name”, RESULT==”1ATA_VBOX_HARDDISK_VBbfb07df0-3eca3187″, NAME=”asm-fra2″, OWNER=”grid”, GROUP=”asmadmin”, MODE=”0660″
— 将该规则文件拷贝到其他节点上;
— 在所有节点上启动udev服务;
/sbin/start_udev
— 检查文件;
ll /dev/
———————– 使用udev配置共享磁盘 ———————–
———————– RAC的启动和关闭顺序 ———————–
1.关闭RAC:
1.关闭数据库:停止所有节点上的实例[oracle@node1 ~]$ srvctl stop database -d ORCL;
2.停止OHAS(Oracle High Availability Services):[root@node1 ~]# $GRID_HOME/crsctl stop has -f;
3.停止集群服务:root@node1 ~]# $GRID_HOME/crsctl stop cluster [-all];
2.启动RAC,默认开机会自启动,手工启动的顺序如下:
1.启动集群:root@node1 ~]# $GRID_HOME/crsctl start cluster [-all];
2.启动OHAS:root@node1 ~]# $GRID_HOME/crsctl start has;
3.启动数据库:[oracle@node1 ~]$ srvctl start database -d ORCL;
———————– RAC的启动和关闭顺序 ———————–
ACOUG Asia Tour – MySQL Taipei
Name of Event: ACOUG Asia Tour – MySQL Taipei
Date & Time: 5/9/2016 13:00-15:00 Asia/Taipei
Address of the Venue: Oracle Education Center, 35F, 66, Sec. 1, Chung Hsiao W. Rd., Taipei 10018, Taiwan, R.O.C
Language: Chinese
Type of the Event: Meeting
Url and other details:https://community.oracle.com/people/royalwzy/blog/2016/02/15/acoug-asia-tour-mysql
Contact:royalwzy, sonne.k.wang@gmail.com
Registration:https://jinshuju.net/f/dB1ZgE
ACOUG Asia Tour – MySQL Tokyo
Name of Event: ACOUG Asia Tour – MySQL Tokyo
Date & Time: 4/6/2016 15:00-17:00 Asia/Tokyo
Address of the Venue: Mitsui Garden Hotel Ginza Premier, 8-13-1 Ginza, Chuo-ku, Tokyo, 104-0061, Japan
Language: English
Type of the Event: Meeting
Url and other details:https://community.oracle.com/people/royalwzy/blog/2016/02/15/acoug-asia-tour-mysql
Contact:royalwzy, sonne.k.wang@gmail.com
Registration:https://jinshuju.net/f/0GZhsZ
ACOUG Asia Tour – MySQL Shanghai
Name of Event: ACOUG Asia Tour – MySQL Shanghai
Date & Time: 3/11/2016 15:00-17:00 Asia/Shanghai
Address of the Venue: Room404, Haitong Securities Tower, 689 Guangdong Road, Shanghai, 200001, P.R.China
Language: Chinese
Type of the Event: Meeting
Url and other details:https://community.oracle.com/people/royalwzy/blog/2016/02/15/acoug-asia-tour-mysql
Contact:royalwzy, sonne.k.wang@gmail.com
Registration:https://jinshuju.net/f/J3Pu6u
Why use MySQL?
主要内容:
• MySQL介绍
• MySQL分布式数据库应用
• MySQL高可用技术介绍
• MySQL相关工具介绍
MySQL压力测试
主要内容:
1.MySQL压力测试基准值;
2.mysqlslap的介绍及使用;
3.sysbench的介绍及使用;
4.tpcc-mysql的介绍及使用;
MySQL压力测试基准值
1.压力测试的目的:
1.确认新的MySQL版本性能相比之前差异多大;比如从5.6变成5.7,或者从官方版本改成Percona分支版本;
2.确认新的服务器性能是否更高,能高多少;比如CPU升级了,阵列卡cache加大了,从机械盘换成SSD盘了;
3.确认一些新的参数调整后,对性能影响多少;比如innodb_flush_log_at_trx_commit,sync_binlog等参数;
4.确认即将上线的新业务对MySQL负载影响多少,是否能承载得住,是否需要对服务器进行扩容或升级配置;
2.针对不同的压测目的,相应的测试方法也有所不同:
1.先说第四种,需要和线上业务结合起来,这时候就需要自行开发测试工具,或者利用tcpcopy(https://github.com/session-replay-tools/tcpcopy)将线上实际用户请求导向测试环境,进行仿真模拟测试;
2.对于前三种,我们通常采用基准测试就可以;比较常用的MySQL基准压力测试工具有tpcc-mysql,sysbench,mysqlslap等几个;
3.如何避免压测时受到缓存的影响:
1.填充测试数据比物理内存还要大,至少超过innodb_buffer_pool_size值,不能将数据全部装载到内存中,除非你的本意就想测试全内存状态下的MySQL性能;
2.每轮测试完成后,都重启mysqld实例,并且用下面的方法删除系统cache,释放swap(如果用到了swap的话),甚至可以重启整个OS;
1.将脏数据刷新到磁盘:sync;
2.清除OS Cache:echo 3 > /proc/sys/vm/drop_caches
3.释放swap:swapoff -a && swapon -a;
4.如何尽可能体现线上业务真实特点:
1.其实上面已经说过了,就是自行开发测试工具或者利用tcpcopy(或类似交换机的mirror功能)将线上实际用户请求导向测试环境,进行仿真模拟测试;
2.利用http_load或siege工具模拟真实的用户请求URL进行压力测试;
5.压测结果如何解读:
1.压测结果除了tps/TpmC指标外,还应该关注压测期间的系统负载数据,尤其是iops,iowait,svctm,%util,每秒I/O字节数(I/O吞吐),事务响应时间(tpcc-mysql/sysbench打印的测试记录中均有);另外,如果I/O设备能提供设备级IOPS,读写延时数据的话,也应该一并关注;
2.假如两次测试的tps/TpmC结果一样的话,那么谁的事务响应时间,iowait,svctm,%util,读写延时更低,就表示那个测试模式有更高的性能提升空间;
6.如何加快tpcc_load加载数据的效率:
1.tpcc_load其实是可以并行加载的,一方面是可以区分ITEMS,WAREHOUSE,CUSTOMER,ORDERS四个维度的数据并行加载;
2.另外,比如最终想加载1000个warehouse的话,也可以分开成1000个并发并行加载的;
3.github上有并行加载的项目tpcc_load_parallel.sh,加载效率至少提升10倍以上;
mysqlslap的介绍及使用
1.mysqlslap简介:
1.它是MySQL从5.1.4版开始自带的一个基准测试工具,该工具可以模拟多个客户端同时并发的向服务器发出查询更新,给出了性能测试数据而且提供了多种引擎的性能比较;
2.mysqlslap为MySQL性能优化前后提供了直观的验证依据,从而帮助DBA准确的掌握线上数据库支撑的用户流量上限及其抗压性等问题;
3.查看帮助:mysqlslap –help
4.使用方法:mysqlslap [OPTIONS];
5.默认的读取配置文件的顺序:/etc/my.cnf,/etc/mysql/my.cnf,/usr/local/mysql/etc/my.cnf,~/.my.cnf;
2.参数说明:
–defaults-file:指定从配置文件中读取选项配置;
-?, –help:查看帮助;
-a, –auto-generate-sql:自动生成测试表和数据;
–auto-generate-sql-add-autoincrement:自动生成的表中添加自增列;
–auto-generate-sql-execute-number=#:自动生成的查询的个数;
–auto-generate-sql-guid-primary:自动在表上添加基于GUID的主键;
–auto-generate-sql-load-type=name:指定测试负载的类型,取值包括:mixed(默认,一半插入一半查询),update,write,key(读主键)和read;
–auto-generate-sql-secondary-indexes=#:在自动生成的表上添加第二索引的个数,默认0;
–auto-generate-sql-unique-query-number=#:生成基于唯一键查询的测试语句数量,默认10;
–auto-generate-sql-unique-write-number=#:生成基于唯一键写的测试语句数量,默认100;
–auto-generate-sql-write-number=#:每个线程执行插入的记录数量,默认100;
–commit=#:多少条DML后提交一次;
-C, –compress:如果服务器和客户端支持都压缩,则压缩信息传递;
-c, –concurrency=name:模拟查询的客户端并发数量,多个可以使用逗号分割;
–create=name:创建表的SQL语句或者文本文件;
–create-schema=name:指定测试的数据库,不指定就自动创建一个mysqlslap的schema;
–csv[=name]:生成CSV格式的结果,如果不指定名字就打印到标准输出,指定名字就打印到指定的文件中;
-#, –debug[=#]:指定debug模式;
–debug-check:退出时检查相关的内存和打开文件使用信息;
-T, –debug-info:额外输出CPU以及内存的相关信息;
–default-auth=name:默认的客户端插件验证文件;
-F, –delimiter=name:定义SQL使用的分隔符;
–detach=#:执行N条语句后断开重连;
–enable-cleartext-plugin:开启/禁用明文验证插件,具体查看MySQL几种身份验证方式;
-e, –engine=name:创建测试表使用的引擎,多个引擎用逗号分割;
-h, –host=name:连接到的服务器信息;
-i, –iterations=#:运行测试的次数;
–no-drop:在测试完成之后不删除测试表;
-x, –number-char-cols=name:测试表中VARCHAR类型列的个数,默认1个,仅当指定–auto-generate-sql参数时有效;
-y, –number-int-cols=name:测试表中VARCHAR类型列的个数,默认1个,仅当指定–auto-generate-sql参数时有效;
–number-of-queries=#:总的测试查询次数(并发客户数×每客户查询次数);
–only-print:不连接到数据库,只打印相应的SQL语句,即测试过程的SQL语句;
-p, –password[=name]:密码信息;
–plugin-dir=name:客户端插件目录;
-P, –port=#:连接的端口号;
–post-query=name:在测试脚本运行后执行的脚本,这个过程不影响时间计算;;
–post-system=name:在测试脚本运行后执行的系统命令;
–pre-query=name:在测试脚本运行前执行的脚本;
–pre-system=name:在测试脚本运行前执行的系统命令;
–protocol=name:用户连接时使用的协议,eg:tcp,socket,pipe,memory;
-q, –query=name:用自定义脚本执行测试
–secure-auth:安全验证,拒绝客户端使用旧的协议连接服务器,默认开启,但是可以指定–skip-secure-auth参数来关闭;
-s, –silent:静默模式下运行程序;
-S, –socket=name:连接时指定socket文件;
–ssl:连接时开启SSL;
-u, –user=name:用户名信息;
-v, –verbose:输出信息的详细的级别,eg:-vvv;
-V, –version:版本信息;
3.查看测试过程:mysqlslap -a –only-print;
4.测试实例(多线程测试):
mysqlslap -uroot -p –concurrency=100 –iterations=1 –auto-generate-sql –auto-generate-sql-load-type=mixed –auto-generate-sql-add-autoincrement –engine=InnoDB –number-of-queries=10 –debug-info
说明:测试100个并发线程;测试次数1次;自动生成SQL测试脚本;读,写,更新混合测试;自增长字段;测试引擎为InnoDB;共运行10次查询;输出CPU资源信息;
5.测试实例(迭代测试,多次测试得出平均值):
mysqlslap -uroot -p –concurrency=50,100,200 –iterations=20 –number-int-cols=4 –number-char-cols=35 –auto-generate-sql –auto-generate-sql-load-type=mixed –auto-generate-sql-add-autoincrement –engine=MyISAM,InnoDB –number-of-queries=200 –debug-info -v
说明:测试50,100,200个并发线程;测试次数20次;四个int列和35个varchar列;自动生成SQL测试脚本;读,写,更新混合测试;自增长字段;测试引擎为M有ISAM,InnoDB;共运行200次查询;输出CPU资源信息;想要输出所有信息加-vvv;
TIPS:并发数越多,执行完所有查询的时间越长,为了准确起见,可以多迭代测试几次;
6.总结:
1.无法规定表中测试数据的数量;
2.可以使用压力测试工具super-smack for MySQL,但是却一直没有人维护了;
— 补充:
MySQL的几种身份验证方式:MySQL主要是用自身的User Table作身份认证,但可以加入其它plugin authentication;
1.The Native Authentication Plugins;
2.The PAM Authentication Plugin;
3.The Windows Native Authentication Plugin;
4.The Clear-Text Client-Side Authentication Plugin:在客户端发送明文给服务端验证,http://dev.mysql.com/doc/refman/5.5/en/cleartext-authentication-plugin.html;
5.The Socket Peer-Credential Authentication Plugin;
6.The Test Authentication Plugin;
sysbench的介绍及使用
1.sysbench简介:
1.sysbench是一个模块化的,跨平台,多线程基准测试工具,主要用于评估测试各种不同系统参数下的数据库负载情况;
2.sysbench的目的是1)不需要设置复杂的数据库基准测试,2)甚至根本不需要安装一个数据库的情况下,可以快速了解系统性能状况;
3.目前sysbench代码托管在github上(https://github.com/akopytov/sysbench),在之前还经历了由sourceforge(http://sysbench.sourceforge.net)到launchpad(https://launchpad.net/sysbench)的迁移;
4.最新版本为0.5;
5.使用C语言写的一个工具;
2.sysbench支持以下几种测试模式:
1.CPU运算性能;
2.磁盘IO性能;
3.调度程序性能;
4.内存分配及传输速度;
5.POSIX线程性能;
6.数据库性能(OLTP基准测试),eg:MySQL,Drizzle(精简版的MySQL分支),PostgreSQL,Oracle等几种数据库;
3.安装sysbench:
1.安装依赖包:sysbench依赖automake和libtool两个包,yum -y install automake libtool;
2.解压缩:unzip sysbench-0.5.zip;
3.自动配置:./autogen.sh;
4.指定编译配置:./configure –prefix=/usr/local/sysbench –with-mysql-includes=/usr/local/mysql/include –with-mysql-libs=/usr/local/mysql/lib;默认支持MySQL,如果需要测试Oracle/PostgreSQL,则在configure时需要加上–with-oracle或者–with-pgsql参数;如果想要默认不支持MySQL,需要添加–without-mysql参数;
5.编译安装:make && make install;
6.修改PATH环境变量;
7.报错修复,[./sysbench: error while loading shared libraries: libmysqlclient.so.18: cannot open shared object file: No such file or directory],是因为sysbench无法找到mysql的库文件,可能是环境变量LD_LIBRARY_PATH没有设置,export LD_LIBRARY_PATH=/usr/local/mysql/lib即可;
4.参数介绍:
1.使用方法:sysbench [general-options]… –test=
2.一般选项:
–num-threads=N:使用的测试线程数,默认为1;
–max-requests=N:最大请求数量,默认为1W,0表示不限制;
–max-time=N:最大执行时间,单位是s,默认0为不限制;与–max-requests二选一;
–forced-shutdown=STRING:超过–max-time指定时间后强制中断,默认为off;
–thread-stack-size=SIZE:每个线程使用的栈大小,默认是64K;
–tx-rate=N:target transaction rate (tps) [0];
–report-interval=N:阶段性的报告中间统计信息,单位为s,默认0为禁用此阶段性的报告;
–report-checkpoints=[LIST,…]:在指定的时间点,导出所有的统计信息,并且重置所有的计数器;可以指定用逗号分割的列表,单位是s,默认是关闭的;
–percentile=N:表示设定采样比例,默认是95%;可以设置99%即丢弃1%的长请求,在剩余的99%里取最大值;
–test=STRING:指定测试的项目;
–debug=[on|off]:是否打印调试信息,默认为off;
–validate=[on|off]:在可能的情况下执行验证检查,默认为off;
–help=[on|off]:查看帮助信息;
–version=[on|off]:打印版本信息;
–rand-init=[on|off]:测试开始时是否初始化随机数生成器,默认为off;
–rand-type=STRING:随机数分布模式,eg:uniform(固定),gaussian(高斯),special(特定的,默认),pareto(帕累托);
1.special表示存在热点数据;
2.uniform表示非热点数据模式;
–rand-spec-iter=N:数字生成器中使用迭代器的数量,默认是12;
–rand-spec-pct=N:special类型数据的比率,默认是1;
–rand-spec-res=N:special值使用的比率,默认是75;
–rand-seed=N:随机数生成器的种子,默认为0;
–rand-pareto-h=N:pareto数据分布模式下参数h的值,默认是0.2;
3.日志选项:
–verbosity=N:日志级别,5是debug级别,0是只打印严重错误信息,默认为3;
–percentile=N: percentile rank of query response times to count [95]
4.测试的项目:
1.fileio – File I/O test
2.cpu – CPU performance test
3.memory – Memory functions speed test
4.threads – Threads subsystem performance test
5.mutex – Mutex performance test
6.oltp – OLTP test,在0.5版本之前有,已被替换掉;
5.命令:
1.prepare:执行测试前的准备工作;比如fileio测试时在磁盘上创建必要的文件,或者在oltp测试时填充测试数据库;
2.run:执行真实的测试;
3.cleanup:测试后移除运行时产生的临时数据;
4.help:查看指定测试项目的帮助;eg:sysbench –test=cpu help;
5.CPU测试:
1.相关选项:
–cpu-max-prime=N:最大质数发生器数量,即产生N个素数,默认为10000;
2.测试计算产生2000个素数所需要的时间:sysbench –test=cpu –cpu-max-prime=2000 run;
3.查看CPU相关信息:less /proc/cpuinfo;
6.线程(threads)测试:
1.测试线程调度器的性能,对于高负载情况下测试线程调度器的行为非常有用;
2.相关选项:
–thread-yields=N:每个请求产生多少个线程,默认为1000;
–thread-locks=N:每个线程的锁的数量,默认为8;
3.使用64个线程,每个请求产生100个线程,线程锁数为2:sysbench –test=threads –num-threads=64 –thread-yields=100 –thread-locks=2 run;
7.文件IO性能测试:
1.相关选项:
–file-num=N:创建测试文件的数量,默认为128;
–file-block-size=N:测试时文件块的大小,默认是16384(16K);
–file-total-size=SIZE:测试文件的总大小,默认是2G;
–file-test-mode=STRING:文件测试模式,eg:seqwr(顺序写),seqrewr(顺序读写),seqrd(顺序读),rndrd(随机读),rndwr(随机写),rndrw(随机读写);
–file-io-mode=STRING:文件操作模式,eg:sync(同步,默认),async(异步),fastmmap(快速map映射),slowmmap(慢map映射);
–file-extra-flags=STRING:使用额外的标志来打开文件,eg:sync,dsync,direct;默认为空;
–file-fsync-freq=N:执行fsync()的频率,默认是100,0表示不使用fsync();
–file-fsync-all=[on|off]:每执行完一次写操作就执行一次fsync,默认是off;
–file-fsync-end=[on|off]:在测试结束时才执行fsync,默认是on;
–file-fsync-mode=STRING:使用哪种方法进行同步,eg:fsync(默认),fdatasync;
–file-merged-requests=N:如果可以,合并最多的IO请求数,默认是0表示不合并;
–file-rw-ratio=N:测试时的读写比例,默认是1.5;
2.测试:文件总大小为2G,20个并发线程,随机读写;
1.prepare阶段:sysbench –test=fileio –num-threads=20 –file-total-size=2G –file-test-mode=rndrw prepare
2.run阶段:sysbench –test=fileio –num-threads=20 –file-total-size=2G –file-test-mode=rndrw run
3.清理测试时生成的文件:sysbench –test=fileio –num-threads=20 –file-total-size=2G –file-test-mode=rndrw cleanup
8.互斥锁(Mutex)测试:
1.相关选项:
–mutex-num=N:数组互斥的总大小,默认是4096;
–mutex-locks=N:每个线程互斥锁的数量,默认是50000;
–mutex-loops=N:内部互斥锁的空循环数量,默认是10000;
2.测试互斥锁的性能,方式是模拟所有线程在同一时刻并发运行,并都短暂请求互斥锁:sysbench –-test=mutex –-num-threads=100 –-mutex-num=1000 –-mutex-locks=100000 –-mutex-loops=10000 run
9.内存测试:
1.相关选项:
–memory-block-size=SIZE:测试时内存块大小,默认是1K;
–memory-total-size=SIZE:传输数据的总大小,默认是100G;
–memory-scope=STRING:内存访问范围,eg:global(默认),local;
–memory-hugetlb=[on|off]:从HugeTLB池内存分配,默认是off;
–memory-oper=STRING: 内存操作类型,eg:read,write(默认),none;
–memory-access-mode=STRING:存储器存取方式,eg:seq(默认),rnd;
2.内存测试测试了内存的连续读写性能:sysbench –test=memory –memory-block-size=8k –memory-total-size=1G run
10.MySQL数据库测试:
1.sysbench v0.5通过一系列LUA脚本来替换之前的oltp,从而来模拟更接近真实的基准测试环境;
2.脚本在/
3.sysbench v0.5默认使用sbtest库,但是需要自己手工先创建好,也可以使用–mysql-db指定,其他非默认项指定选项:
–mysql-host=[LIST,…]:MySQL服务器地址,默认为localhost;
–mysql-port=N:MySQL服务器端口号,默认为3306;
–mysql-socket=STRING:MySQL socket;
–mysql-user=STRING:MySQL用户,默认为sbtest;
–mysql-password=STRING:MySQL密码;
–mysql-db=STRING:MySQL数据库名称,默认为dbtest;
–mysql-table-engine=STRING:使用的引擎,eg:myisam,innodb(默认),bdb,heap,ndbcluster,federated;
–mysql-engine-trx=STRING:存储引擎是否使用事务,eg:yes,no,auto(默认);
–mysql-ssl=[on|off]:是否使用ssl连接,默认为off;
–mysql-create-options=:创建脚本是否添加CREATE TABLE,默认为空;
4.准备阶段:生成表并插入数据,可使用parallel_prepare.lua脚本来并行准备数据;
–db-driver:服务器类型,eg:mysql(默认),drizzle;
–mysql-table-engine:表存数引擎;
–myisam-max-rowsMyISAM引擎表的最大记录数,默认为100W;
–oltp-table-count:生成表数量,名字为:sbtest1、sbtest2…;
–oltp-table-size:生成表的行数;
–oltp-secondary:ID列生成二级索引而不是主键;
–oltp-auto-inc=[on|off]:设置ID列是否自增,默认为on;
5.运行阶段:
–oltp-tables-count=N:表的数量;
–oltp-read-only=[on|off]:是否仅执行SELECT测试;默认为off,表示不要进行只读测试,也就是会采用读写混合模式测试;
–oltp-dist-type:随机数分布状态,eg:uniform(均匀分布),gauss(高斯分布),special(特殊分布);
–oltp-dist-pct:特殊分布的百分比值;
–oltp-dist-res:特殊分布的百分比;
–oltp-point-selects:单个事务中指定的selec查询个数;
–oltp-range-size:范围查询的范围大小,该值应比oltp-table-size小;
–oltp-simple-ranges:单个事务中指定的简单范围查询个数;
–oltp-sum-ranges:单个事务中指定的SUM范围查询个数;
–oltp-order-ranges:单个事务中指定的ORDER范围查询个数;
–oltp-distinct-ranges:单个事务中指定的DISTINCT范围查询个数;
–oltp-index-updates:单个事务中指定的使用索引更新的个数;
–oltp-non-index-updates:单个事务中指定的不使用索引更新的个数;
6.清理阶段;
7.测试:
1.准备(方法1):sysbench –mysql-db=test –mysql-user=root –mysql-password= –test=/tools/sysbench-0.5/sysbench/tests/db/oltp.lua –mysql-table-engine=innodb –oltp-table-size=100000 prepare
2.准备(方法2,准备数据后运行):也可使用parallel_prepare.lua脚本并行准备测试数据,线程数应该为运行表的倍数;sysbench –mysql-db=sbtest –mysql-user=root –mysql-password= –test=/tools/sysbench-0.5/sysbench/tests/db/parallel_prepare.lua –mysql-table-engine=innodb –oltp-table-size=100000 –num-threads=10 –oltp-tables-count=10 run
3.运行:sysbench –mysql-db=test –mysql-user=root –mysql-password= –test=/tools/sysbench-0.5/sysbench/tests/db/oltp.lua –num_threads=10 –oltp-tables-count=10 –oltp-table-size=100000 –num-threads=8 –report-interval=10 –rand-type=uniform –max-time=100 –percentile=99 run
4.清理:sysbench –mysql-db=test –mysql-user=root –mysql-password= –test=/tools/sysbench-0.5/sysbench/tests/db/oltp.lua –oltp-table-size=100000 –oltp-tables-count=10 cleanup
8.可以对数据库进行调优后,再使用sysbench对OLTP进行测试,看看TPS是不是会有所提高;
9.TIPS:
1.sysbench的测试只是基准测试,并不能代表实际企业环境下的性能指标;
2.真实测试场景中,数据表建议不低于10个,单表数据量不低于500万行,当然了,要视服务器硬件配置而定;如果是配备了SSD或者PCIE SSD这种高IOPS设备的话,则建议单表数据量最少不低于1亿行;
3.真实测试场景中,建议持续压测时长不小于30分钟,否则测试数据可能不具参考意义;
10.参考文档:https://www.percona.com/docs/wiki/benchmark:sysbench:olpt.lua
— 运行报告解读;
Threads started!
— 每10秒钟报告一次测试结果:tps,每秒读,每秒写,99%以上的响应时长统计;
[ 10s] threads: 8, tps: 1111.51, reads/s: 15568.42, writes/s: 4446.13, response time: 9.95ms (99%)
[ 20s] threads: 8, tps: 1121.90, reads/s: 15709.62, writes/s: 4487.80, response time: 9.78ms (99%)
[ 30s] threads: 8, tps: 1120.00, reads/s: 15679.10, writes/s: 4480.20, response time: 9.84ms (99%)
[ 40s] threads: 8, tps: 1114.20, reads/s: 15599.39, writes/s: 4456.30, response time: 9.90ms (99%)
[ 50s] threads: 8, tps: 1114.00, reads/s: 15593.60, writes/s: 4456.70, response time: 9.84ms (99%)
[ 60s] threads: 8, tps: 1119.30, reads/s: 15671.60, writes/s: 4476.50, response time: 9.99ms (99%)
OLTP test statistics:
queries performed:
read: 938224 — 读总数
write: 268064 — 写总数
other: 134032 — 其他操作总数(SELECT,INSERT,UPDATE,DELETE之外的操作,例如COMMIT等)
total: 1340320 — 全部总数
transactions: 67016 (1116.83 per sec.) — 总事务数(每秒事务数)
deadlocks: 0 (0.00 per sec.) — 发生死锁总数
read/write requests: 1206288 (20103.01 per sec.) — 读写总数(每秒读写次数)
other operations: 134032 (2233.67 per sec.) — 其他操作总数(每秒其他操作次数)
General statistics: — 一些统计结果
total time: 60.0053s — 总耗时
total number of events: 67016 — 共发生多少事务数
total time taken by event execution: 479.8171s — 所有事务耗时相加(不考虑并行因素)
response time: — 响应时长统计
min: 4.27ms — 最小耗时
avg: 7.16ms — 平均耗时
max: 13.80ms — 最长耗时
approx. 99 percentile: 9.88ms — 超过99%平均耗时
Threads fairness:
events (avg/stddev): 8377.0000/44.33
execution time (avg/stddev): 59.9771/0.00
tpcc-mysql的介绍及使用
1.tpcc-mysql简介:
1.TPC-C是专门针对联机交易处理系统(OLTP系统)的规范,一般情况下我们也把这类系统称为业务处理系统;
2.tpcc-mysql是percona基于TPC-C(下面简写成TPCC)衍生出来的产品,专用于MySQL基准测试;
3.tpcc-mysql通过模拟一个电商的业务,主要包含的业务有新增订单,库存查询,发货,支付等模块的测试,用来测试典型的复杂OLTP系统的性能;
4.其源码放在launchpad上,用bazaar管理,项目地址:https://code.launchpad.net/~percona-dev/perconatools/tpcc-mysql;
2.安装:
1.解压缩:gunzip tpcc-mysql-src.tgz;tar -xvf tpcc-mysql-src.tar;
2.安装:cd /path/tpcc-mysql/src; make; 之后会在/path/tpcc-mysql目录下生成两个tpcc 命令行工具:tpcc_load,tpcc_start;
1.tpcc_load:提供初始化数据的功能;
2.tpcc_start:进行压力测试;
3.移动工具位置:mv /tools/tpcc-mysql/tpcc_start /tools/tpcc-mysql/tpcc_load /usr/local/bin/;
3.查看帮助:
1.tpcc_load –help:
usage: tpcc_load [server] [DB] [user] [pass] [warehouse]
OR
tpcc_load [server] [DB] [user] [pass] [warehouse] [part] [min_wh] [max_wh]
* [part]: 1=ITEMS 2=WAREHOUSE 3=CUSTOMER 4=ORDERS
1.Server:服务器名;
2.DB:数据库名;
3.user:用户名;
4.pass:密码;
5.warehouse:测试库下仓库的数量;
6.part:tpcc_load其实是可以并行加载的,可以区分ITEMS/WAREHOUSE/CUSTOMER/ORDERS四个维度的数据并行加载(github上已经实现的并行加载的项目tpcc_load_parallel.sh:https://gist.github.com/sh2/3458844);
2.tpcc_start –help:
Usage: tpcc_start -h server_host -P port -d database_name -u mysql_user -p mysql_password -w warehouses -c connections -r warmup_time -l running_time -i report_interval -f report_file -t trx_file
1.-h server_host:服务器名;
2.-P port:端口号,默认为3306;
3.-d database_name:数据库名;
4.-u mysql_user:用户名;
5.-p mysql_password:密码;
6.-w warehouses:仓库的数量;
7.-c connections:线程数,默认为1;
8.-r warmup_time:预热时间,预热是为了将数据加载到内存,单位s,默认为10s;
9.-l running_time:测试时间,单位s,默认为20s;
10.-i report_interval:指定生成报告间隔时长;
11.-f report_file:测试结果输出文件;
12.-t trx_file:事务文件;
4.测试前准备工作:
1.创建测试数据库:mysql -uroot -p -e “CREATE DATABASE tpcc”;
2.创建表:mysql -uroot -p tpcc < /tools/tpcc-mysql/create_table.sql;
3.添加外键:mysql -uroot -p tpcc < /tools/tpcc-mysql/add_fkey_idx.sql;
4.查看tpcc-mysql的业务逻辑及其相关的几个表作用如下:
1.customer:客户表;
2.district:地区表;
3.history:支付信息表;
4.item:商品信息表;
5.new_orders:新订单表,其它信息还是存在orders表中;
6.order_line:发货信息表;
7.orders:订单表;
8.stock:库存信息表;
9.warehouse:仓库表;
5.测试:
1.单进程加载数据:tpcc_load localhost tpcc root "" 5;
2.对5个数据仓库,预热10秒,100个并发连接,运行60秒:tpcc_start -h localhost -d tpcc -u root -p "" -w 5 -c 100 -r 10 -l 60 -i 10 -f rpt_tpcc -t tr;
6.不足:
1.没有自增列作为主键:如果仅作为基准测试问题不大,但和我们实际生产中的设计模式可能有一定区别,相信大多数人还是习惯使用自增列作为主键的;
2.使用外键:个人认为MySQL对外键支持并不是太好,并且一定程度上影响并发性能,因此建议取消外键,仅保留一般的索引;
7.其它:
1.真实测试场景中,仓库数一般不建议少于100个;视服务器硬件配置而定,如果是配备了SSD或者PCIE SSD这种高IOPS设备的话,建议最少不低于1000个;
2.真实测试场景中,建议预热时间不小于5分钟,持续压测时长不小于30分钟,否则测试数据可能不具参考意义;
3.需要注意的是tpcc默认会读取/var/lib/mysql/mysql.sock这个socket文件,如果你的socket文件不在相应路径的话,可以做个软连接;或者通过TCP/IP的方式连接测试服务器;
4.script目录下的一些脚本主要是一些性能数据采集以及分析的;
5.可以使用gunpolt工具画图;
-- 测试结果解读;
[root@ocp ~]# tpcc_start -h localhost -d tpcc -u root -p "" -w 5 -c 100 -r 10 -l 60 -i 10 -f rpt_tpcc -t tr;
***************************************
*** ###easy### TPC-C Load Generator ***
***************************************
option h with value 'localhost'
option d with value 'tpcc'
option u with value 'root'
option p with value ''
option w with value '5'
option c with value '100'
option r with value '10'
option l with value '60'
option i with value '10'
option f with value 'rpt_tpcc'
option t with value 'tr'
[server]: localhost
[port]: 3306
[DBname]: tpcc
[user]: root
[pass]:
[warehouse]: 5
[connection]: 100
[rampup]: 10 (sec.)
[measure]: 60 (sec.)
RAMP-UP TIME.(10 sec.)
— 预热结束,开始进行压测;
MEASURING START.
— 为了能够清晰的说明以下内容,首先定义一些变量,便于以下的计算和说明:
1.success:执行成功的记录数;
2.late:执行延迟的记录数;
3.pre_success:上一次执行成功的记录数;
4.pre_late:上一次执行失败的记录数;
— 根据以上定义的变量,计算相应字段的结果和说明相应字段的含义:
1.时间间隔内成功的事务(包括成功和延迟的事务):sl=success+late-pre_success-pre_late;
2.时间间隔内延迟的事务:l=late-pre_late;
3.时间间隔内前90%记录(实际为99%)的平均响应时间:rt90;
4.时间间隔内最大的响应时间:max_rt;
— Count New-Order Payment Order-Status Delivery Stock-Level
— #, sl(l):rt90|max_rt , sl(l):rt90|max_rt , sl(l):rt90|max_rt, sl(l):rt90|max_rt, sl(l):rt90|max_rt
— 新订单成功执行压测的次数(推迟执行压测的次数):90%事务的响应时间|本轮测试最大响应时间;
10, 485(0):2.431|3.536, 505(0):0.709|1.550, 49(0):0.331|0.363, 48(0):3.061|3.162, 49(0):5.823|6.181
20, 511(0):2.544|3.928, 517(0):0.813|1.757, 52(0):0.204|0.235, 52(0):2.543|2.725, 52(0):5.964|6.062
30, 516(0):2.109|3.152, 510(0):0.493|1.421, 51(0):0.257|0.415, 50(0):2.684|2.855, 51(0):5.783|5.875
40, 480(2):3.008|8.578, 479(0):1.688|1.882, 47(0):0.241|2.038, 47(0):2.869|3.197, 48(0):6.349|6.550
50, 478(1):2.926|10.509, 481(0):1.080|1.795, 48(0):0.406|1.721, 47(0):2.810|2.877, 48(0):6.247|7.598
60, 434(4):3.783|7.095, 426(0):1.258|1.724, 44(0):0.398|1.789, 45(0):3.080|3.604, 45(0):7.136|8.169
— 压测结束;
STOPPING THREADS……………………………………………………………………………………….
— 第一次结果统计;
— 成功(success,sc)次数,延迟(late,lt)次数,重试(retry,rt)次数,失败(failure,fl)次数;
[0] sc:2897 lt:7 rt:0 fl:0 — New-Order:新订单业务;
[1] sc:2918 lt:0 rt:0 fl:0 — Payment:支付业务统计;
[2] sc:291 lt:0 rt:0 fl:0 — Order-Status:订单状态业务统计;
[3] sc:289 lt:0 rt:0 fl:0 — Delivery:发货业务统计;
[4] sc:293 lt:0 rt:0 fl:0 — Stock-Level:库存业务统计;
in 60 sec.
— 第二次统计结果;
[0] sc:2897 lt:7 rt:0 fl:0
[1] sc:2918 lt:0 rt:0 fl:0
[2] sc:291 lt:0 rt:0 fl:0
[3] sc:289 lt:0 rt:0 fl:0
[4] sc:293 lt:0 rt:0 fl:0
— 下面所有业务逻辑结果都必须为OK才行;
[transaction percentage]
Payment: 43.58% (>=43.0%) [OK] — 支付成功次数(sc + lt)必须大于43.0%,否则结果为NG,而不是OK;
Order-Status: 4.35% (>= 4.0%) [OK]
Delivery: 4.32% (>= 4.0%) [OK]
Stock-Level: 4.38% (>= 4.0%) [OK]
— 响应耗时指标必须超过90%通过才行;
[response time (at least 90% passed)]
New-Order: 99.76% [OK]
Payment: 100.00% [OK]
Order-Status: 100.00% [OK]
Delivery: 100.00% [OK]
Stock-Level: 100.00% [OK]
2904.000 TpmC
— TpmC结果值(每分钟事务数,该值是第一次统计结果中的新订单事务数除以总耗时分钟数,eg:(2897+7)/1 = 2904.000;
Oracle11g备库报ORA-00367和ORA-19527的问题
首先看一下alter.log文件中的错误信息(片段):
Tue Dec 22 06:00:47 2015
SRL log 13 needs clearing because log has not been created
Errors in file /app/sungard/oracle/diag/rdbms/futures8_standby/futures8/trace/futures8_rfs_29400.trc:
ORA-00367: checksum error in log file header
ORA-00315: log 13 of thread 0, wrong thread # 1 in header
ORA-00312: online log 13 thread 0: ‘/ora_data/oradata/futures8_standby/redo03.log’
SRL log 14 needs clearing because log has not been created
Errors in file /app/sungard/oracle/diag/rdbms/futures8_standby/futures8/trace/futures8_rfs_29400.trc:
ORA-00367: checksum error in log file header
ORA-00315: log 14 of thread 0, wrong thread # 1 in header
ORA-00312: online log 14 thread 0: ‘/ora_data/oradata/futures8_standby/redo04.log’
Oracle官方给出的引起这三个错的原因和处理的办法:
—————————————————————————————-
Error: ORA-00367
Cause: The file header for the redo log contains a checksum that does not match
the value calculated from the file header as read from disk. This means
the file header is corrupted
Action: Find the correct file and try again.
—————————————————————————————-
Error: ORA-00315
Cause: The online log is corrupted or is an old version.
Action: Find and install correct version of log or reset logs.
—————————————————————————————-
Error: ORA-00312
Cause: The control file change sequence number in the log file is greater
than the number in the control file. This implies that the wrong control
file is being used. Note that repeatedly causing this error can make it
stop happening without correcting the real problem.
Action: Use the current control file or do backup control file recovery to make the
control file current. Be sure to follow all restrictions on doing a backup
control file recovery.
—————————————————————————————-
根据官方提示可以看出,是因为控制文件中记录的SCN小于日志文件头部记录的SCN引起的,从而需要通过还原最新的控制文件来解决;这种方式是非常麻烦的,还需要还原数据文件并以resetlogs的方式打开;
除了以上办法,还可以通过清空日志文件的方式,来同步控制文件和日志头SCN:
ALTER DATABASE CLEAR LOGFILE GROUP 13;
命令执行之后会报另外的错误:
ORA-19527: physical standby redo log must be renamed
ORA-00312: online log 13 thread 0: ‘/ora_data/oradata/futures8_standby/redo03.log’
这个错误是10gR2之后功能的增强引起的:在做主备切换的时候,需要将备库的联机日志文件清除(CLEAR ONLINE REDO LOGFILE),为了加快SWITCHOVER的速度,Oracle10gR2之后在将备库置于MANGED STANDBY状态的时候就提前将这个CLEAR的动作做了,这个想法是好的,只是实现有点糟糕,然后会在alert.log文件里记录错误一堆错误;
This is in fact an Enhancement to the Data Guard Technology introduced in 10.2.0.
The Goal here is to improve speed of Switchover and Failover. In previous Versions a Role Transition would require to clear the Online Redo Logfiles before it can become a Primary Database. Now we attempt to clear the Online Redo Logfiles when starting Managed Recovery.
If the Files exist then they will be cleared, but if they do not exist we report the Error, attempts to create the Online Redo Logfiles and starts Recovery. Even if this is not possible because of different Structure and log_file_name_convert is not set, MRP does not fail; it only raises these Errors.
As an extra Enhancement if the Online Redologs do exist you must specify the log_file_name_convert Parameter even if there is no difference in the Name. This has been implemented to reduce the chances that the Primary Online Redologs are cleared when MRP starts. It is the equivalent of asking – Are you sure you want the logs to be called this….
If the log_file_name_convert parameter is not set then the ORA-19527 is reported and the log file is not cleared at this time..
Solution to stop both of these errors is to ensure log_file_name_convert is set correctly. If the File Structure is the same on the Primary and Standby Database you can set log_file_name_convert to a dummy Value;
好在给出了解决办法,只需要设置LOG_FILE_NAME_CONVERT参数即可,即便是主备目录是一致的,那么完整的解决办法如下:
ALTER DATABASE RECOVER MANAGED STANDBY DATABASE CANCEL;
ALTER SYSTEM SET LOG_FILE_NAME_CONVERT=’/ora_data/oradata/futures8/’,’/ora_data/oradata/futures8/’,’/ora_data/oradata/futures8_standby/’,’/ora_data/oradata/futures8_standby/’ SCOPE=SPFILE;
STARTUP IMMEDIATE;
STARTUP MOUNT;
ALTER DATABASE CLEAR LOGFILE GROUP 13;
ALTER DATABASE CLEAR LOGFILE GROUP 14;
ALTER DATABASE CLEAR LOGFILE GROUP 15;
ALTER DATABASE CLEAR LOGFILE GROUP 16;
ALTER DATABASE CLEAR LOGFILE GROUP 17;
ALTER DATABASE CLEAR LOGFILE GROUP 18;
ALTER DATABASE RECOVER MANAGED STANDBY DATABASE [USING CURRENT LOGFILE] DISCONNECT FROM SESSION;
参考文档:Note 1532566.1, Note 352879.1
DataGuard主从不同步案例处理(ORA-01274)
问题描述:
1.Oracle11.2.0.3 DataGuard环境,主库在做表空间扩容时添加了很多数据文件,但是备机空间不足,导致文件创建失败,进而无法正常同步;
2.在备库的alert文件中报ORA-01274的错误,提示创建失败的文件在控制文件中被重命名为$ORACLE_HOME/dbs/UNNAMED0048,而且MRP进程中止;
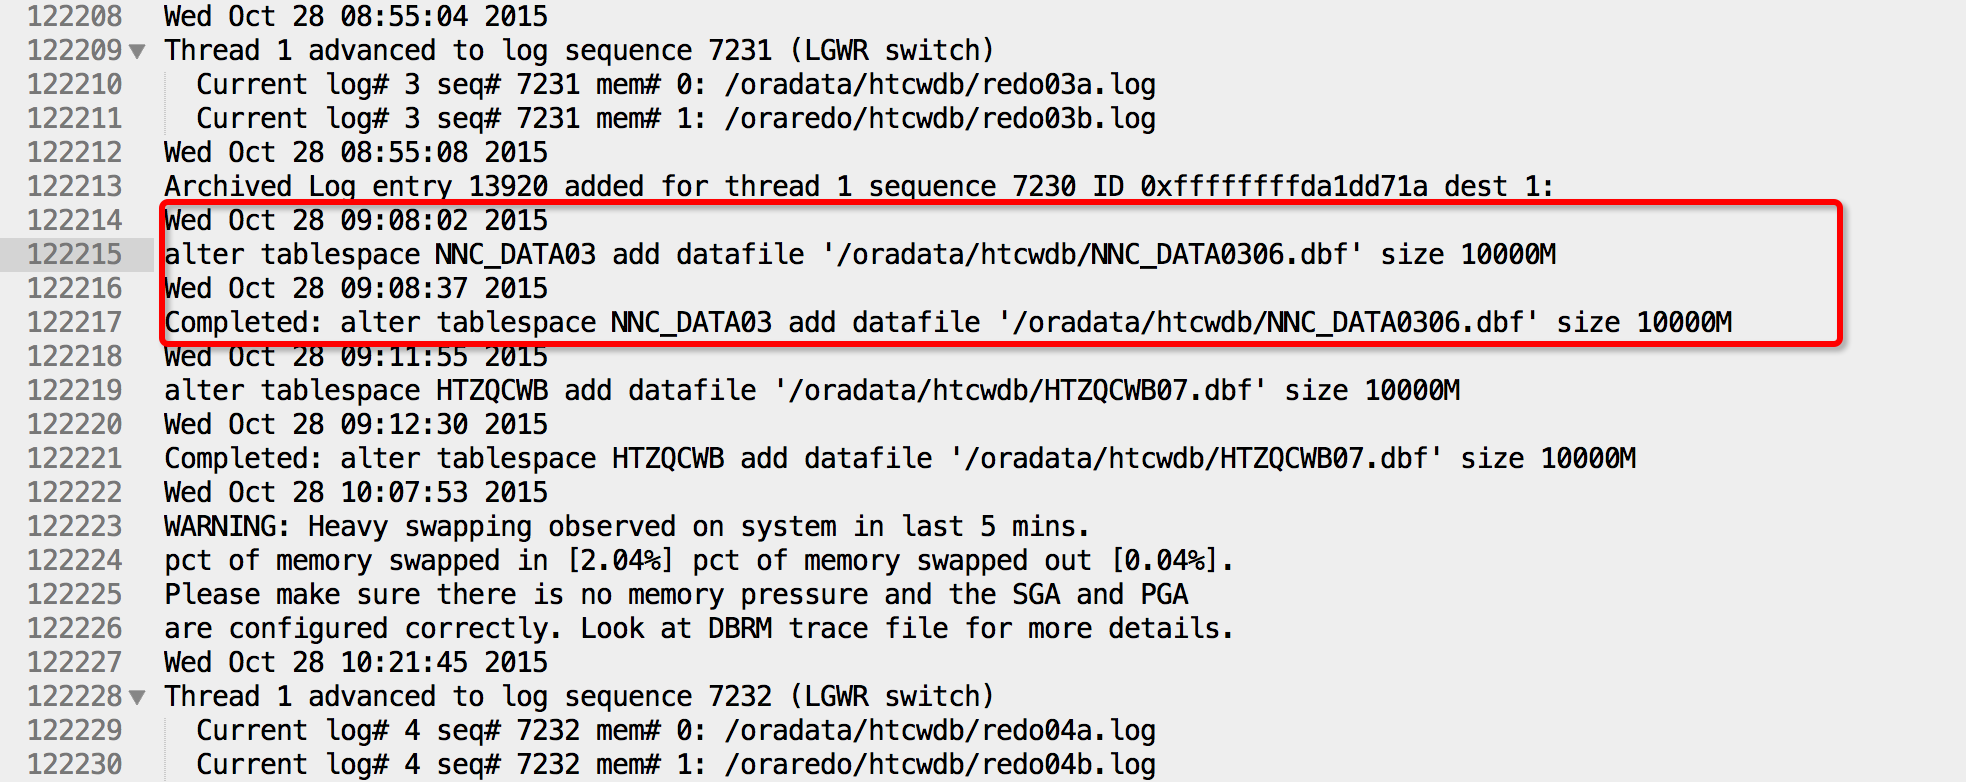
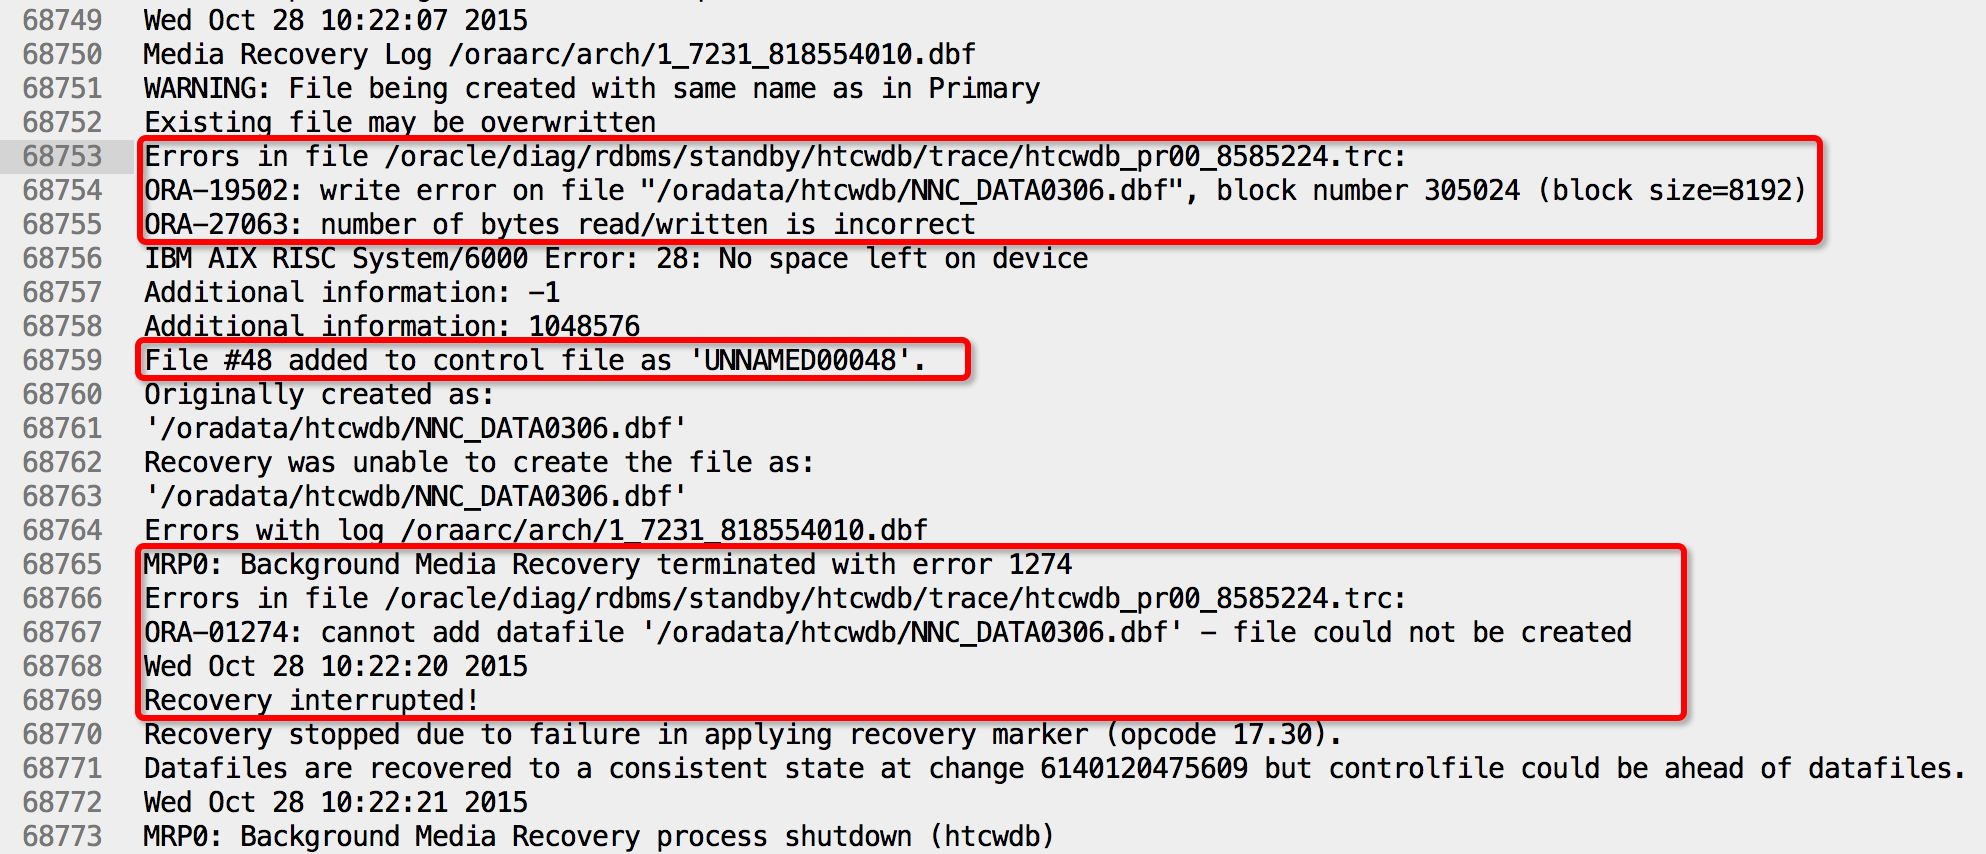
处理步骤:
1.修改备机管理模式为手动:ALTER SYSTEM SET STANDBY_FILE_MANAGEMENT = MANUAL;
2.创建丢失文件:ALTER DATABASE CREATE DATAFILE ‘/oracle/product/11.2.0/db_1/dbs/UNNAMED00048’ AS ‘/oradata/htcwdb/NNC_DATA0306.dbf’;
3.修改备机管理模式为自动:ALTER SYSTEM SET STANDBY_FILE_MANAGEMENT = AUTO;
4.恢复日志[并从主机接收日志]:RECOVER STANDBY DATABASE [DISCONNECT FROM SESSION];或者
5.接受日志并实时应用:ALTER DATABASE RECOVER MANAGED STANDBY DATABASE USING CURRENT LOGFILE DISCONNECT FROM SESSION;
MySQL Full-Text Search Tutorial
Table of Contents
1.MySQL Full-Text Search Introduction
2.Three Types of Full-Text Searches
3.MySQL Full-Text Stopwords
4.Fine-Tuning MySQL Full-Text Search
5.MySQL Full-Text Restrictions
Data Organization in InnoDB
Table of Contents
1.Various files that are created by InnoDB
2.Logical data organization like tablespaces, pages, segments and extents
3.Explore each of them in some detail and discuss about their relationship with each other
4.Data layout within the InnoDB storage engine
Oracle Enterprise Manager for MySQL Database Installation
主要内容:
1.简单介绍;
2.安装的必要条件;
3.下载并部署插件;
4.配置一个MySQL目标端;
5.删除一个目标端;
6.相关日志;
Oracle Enterprise Manager Cloud Control 12cR5 Agent Installation
主要内容:
1.12c Cloud Control Agent介绍;
2.添加主机资源;
3.添加数据库等其它资源;
Oracle Enterprise Manager Cloud Control 12cR5 Agent Installation
Oracle Enterprise Manager Cloud Control 12c Release 5 Installation on Oracle Linux 6.6
主要内容:
1.准备环境;
2.安装数据库软件;
3.创建资源库;
4.安装12c Cloud Control;
5.启动和关闭;
Oracle Enterprise Manager Cloud Control 12c Release 5 Installation on Oracle Linux 6.6
MySQL EXPLAIN
explain显示了mysql如何使用索引来处理select语句以及连接表。可以帮助选择更好的索引和写出更优化的查询语句。
使用方法,在select语句前加上explain就可以了:
如:
- explain select surname,first_name form a,b where a.id=b.id
EXPLAIN列的解释:
table:显示这一行的数据是关于哪张表的
type:这是重要的列,显示连接使用了何种类型。从最好到最差的连接类型为const、eq_reg、ref、range、indexhe和ALL
possible_keys:显示可能应用在这张表中的索引。如果为空,没有可能的索引。可以为相关的域从WHERE语句中选择一个合适的语句
key: 实际使用的索引。如果为NULL,则没有使用索引。很少的情况下,MYSQL会选择优化不足的索引。这种情况下,可以在SELECT语句中使用USE INDEX(indexname)来强制使用一个索引或者用IGNORE INDEX(indexname)来强制MYSQL忽略索引
key_len:使用的索引的长度。在不损失精确性的情况下,长度越短越好
ref:显示索引的哪一列被使用了,如果可能的话,是一个常数
rows:MYSQL认为必须检查的用来返回请求数据的行数
Extra:关于MYSQL如何解析查询的额外信息。将在表4.3中讨论,但这里可以看到的坏的例子是Using temporary和Using filesort,意思MYSQL根本不能使用索引,结果是检索会很慢
extra列返回的描述的意义
Distinct:一旦MYSQL找到了与行相联合匹配的行,就不再搜索了
Not exists: MYSQL优化了LEFT JOIN,一旦它找到了匹配LEFT JOIN标准的行,就不再搜索了
Range checked for each Record(index map:#):没有找到理想的索引,因此对于从前面表中来的每一个行组合,MYSQL检查使用哪个索引,并用它来从表中返回行。这是使用索引的最慢的连接之一
Using filesort: 看到这个的时候,查询就需要优化了。MYSQL需要进行额外的步骤来发现如何对返回的行排序。它根据连接类型以及存储排序键值和匹配条件的全部行的行指针来排序全部行
Using index: 列数据是从仅仅使用了索引中的信息而没有读取实际的行动的表返回的,这发生在对表的全部的请求列都是同一个索引的部分的时候
Using temporary 看到这个的时候,查询需要优化了。这里,MYSQL需要创建一个临时表来存储结果,这通常发生在对不同的列集进行ORDER BY上,而不是GROUP BY上
Where used 使用了WHERE从句来限制哪些行将与下一张表匹配或者是返回给用户。如果不想返回表中的全部行,并且连接类型ALL或index,这就会发生,或者是查询有问题不同连接类型的解释(按照效率高低的顺序排序)
system 表只有一行:system表。这是const连接类型的特殊情况
const:表中的一个记录的最大值能够匹配这个查询(索引可以是主键或惟一索引)。因为只有一行,这个值实际就是常数,因为MYSQL先读这个值然后把它当做常数来对待
eq_ref:在连接中,MYSQL在查询时,从前面的表中,对每一个记录的联合都从表中读取一个记录,它在查询使用了索引为主键或惟一键的全部时使用
ref:这个连接类型只有在查询使用了不是惟一或主键的键或者是这些类型的部分(比如,利用最左边前缀)时发生。对于之前的表的每一个行联合,全部记录都将从表中读出。这个类型严重依赖于根据索引匹配的记录多少—越少越好
range:这个连接类型使用索引返回一个范围中的行,比如使用>或<查找东西时发生的情况
index: 这个连接类型对前面的表中的每一个记录联合进行完全扫描(比ALL更好,因为索引一般小于表数据)
ALL:这个连接类型对于前面的每一个记录联合进行完全扫描,这一般比较糟糕,应该尽量避免
mysql> explain select * from user where user=’root’\G
*************************** 1. row ***************************
id: 1
select_type: SIMPLE
table: user
type: ALL
possible_keys: NULL
key: NULL
key_len: NULL
ref: NULL
rows: 5
Extra: Using where
1 row in set (0.00 sec)
SHOW PROCESSLIST介绍和使用
processlist命令的输出结果显示了有哪些线程在运行,可以帮助识别出有问题的查询语句,两种方式使用这个命令。
1. 进入mysql/bin目录下输入mysqladmin processlist;
2. 启动mysql,输入show processlist;
如果有SUPER权限,则可以看到全部的线程,否则,只能看到自己发起的线程(这是指,当前对应的MySQL帐户运行的线程)。
mysql> show processlist
-> ;
+—-+——-+———————-+——+———+——+——-+——————+
| Id | User | Host | db | Command | Time | State | Info |
+—-+——-+———————-+——+———+——+——-+——————+
| 34 | ucjmh | 192.168.56.101:54031 | NULL | Query | 0 | NULL | show processlist |
+—-+——-+———————-+——+———+——+——-+——————+
1 row in set (0.00 sec)
mysql> exit
Bye
[root@ucjmh ~]# mysql -uroot -poracle
Welcome to the MySQL monitor. Commands end with ; or \g.
Your MySQL connection id is 35
Server version: 5.5.41-log Source distribution
Copyright (c) 2000, 2014, Oracle and/or its affiliates. All rights reserved.
Oracle is a registered trademark of Oracle Corporation and/or its
affiliates. Other names may be trademarks of their respective
owners.
Type ‘help;’ or ‘\h’ for help. Type ‘\c’ to clear the current input statement.
mysql> show processlist;
+—-+——+———–+——+———+——+——-+——————+
| Id | User | Host | db | Command | Time | State | Info |
+—-+——+———–+——+———+——+——-+——————+
| 35 | root | localhost | NULL | Query | 0 | NULL | show processlist |
+—-+——+———–+——+———+——+——-+——————+
1 row in set (0.00 sec)
各列的含义和用途:
id,标识会话id 类似于oracle中的sid,你要kill一个语句的时候很有用。
user列,显示单前用户,如果不是root,这个命令就只显示你权限范围内的sql语句。
host列,显示这个语句是从哪个ip的哪个端口上发出的。用来追踪出问题语句的用户。
db列,显示这个进程目前连接的是哪个数据库。
command列,显示当前连接的执行的命令,一般就是休眠(sleep),查询(query),连接(connect)。
time列,此这个状态持续的时间,单位是秒。
state列,显示使用当前连接的sql语句的状态,很重要的列,后续会有所有的状态的描述,请注意,state只是语句执行中的某一个状态,一个sql语句,已查询为例,可能需要经过copying to tmp table,Sorting result,Sending data等状态才可以完成,
info列,显示这个sql语句,因为长度有限,所以长的sql语句就显示不全,但是一个判断问题语句的重要依据。Checking table
正在检查数据表(这是自动的)。
Closing tables
正在将表中修改的数据刷新到磁盘中,同时正在关闭已经用完的表。这是一个很快的操作,如果不是这样的话,就应该确认磁盘空间是否已经满了或者磁盘是否正处于重负中。
Connect Out
复制从服务器正在连接主服务器。
Copying to tmp table on disk
由于临时结果集大于tmp_table_size,正在将临时表从内存存储转为磁盘存储以此节省内存。
Creating tmp table
正在创建临时表以存放部分查询结果。
deleting from main table
服务器正在执行多表删除中的第一部分,刚删除第一个表。
deleting from reference tables
服务器正在执行多表删除中的第二部分,正在删除其他表的记录。
Flushing tables
正在执行FLUSH TABLES,等待其他线程关闭数据表。
Killed
发送了一个kill请求给某线程,那么这个线程将会检查kill标志位,同时会放弃下一个kill请求。MySQL会在每次的主循环中检查kill标志位,不过有些情况下该线程可能会过一小段才能死掉。如果该线程程被其他线程锁住了,那么kill请求会在锁释放时马上生效。
Locked
被其他查询锁住了。
Sending data
正在处理Select查询的记录,同时正在把结果发送给客户端。
Sorting for group
正在为GROUP BY做排序。
Sorting for order
正在为ORDER BY做排序。
Opening tables
这个过程应该会很快,除非受到其他因素的干扰。例如,在执Alter TABLE或LOCK TABLE语句行完以前,数据表无法被其他线程打开。正尝试打开一个表。
Removing duplicates
正在执行一个Select DISTINCT方式的查询,但是MySQL无法在前一个阶段优化掉那些重复的记录。因此,MySQL需要再次去掉重复的记录,然后再把结果发送给客户端。
Reopen table
获得了对一个表的锁,但是必须在表结构修改之后才能获得这个锁。已经释放锁,关闭数据表,正尝试重新打开数据表。
Repair by sorting
修复指令正在排序以创建索引。
Repair with keycache
修复指令正在利用索引缓存一个一个地创建新索引。它会比Repair by sorting慢些。
Searching rows for update
正在讲符合条件的记录找出来以备更新。它必须在Update要修改相关的记录之前就完成了。
Sleeping
正在等待客户端发送新请求.
System lock
正在等待取得一个外部的系统锁。如果当前没有运行多个mysqld服务器同时请求同一个表,那么可以通过增加–skip-external-locking参数来禁止外部系统锁。
Upgrading lock
Insert DELAYED正在尝试取得一个锁表以插入新记录。
Updating
正在搜索匹配的记录,并且修改它们。
User Lock
正在等待GET_LOCK()。
Waiting for tables
该线程得到通知,数据表结构已经被修改了,需要重新打开数据表以取得新的结构。然后,为了能的重新打开数据表,必须等到所有其他线程关闭这个表。以下几种情况下会产生这个通知:FLUSH TABLES tbl_name, Alter TABLE, RENAME TABLE, REPAIR TABLE, ANALYZE TABLE,或OPTIMIZE TABLE。
waiting for handler insert
Insert DELAYED已经处理完了所有待处理的插入操作,正在等待新的请求。
大部分状态对应很快的操作,只要有一个线程保持同一个状态好几秒钟,那么可能是有问题发生了,需要检查一下。
这个命令中最关键的就是state列,mysql列出的状态主要有以下几种:
Checking table
正在检查数据表(这是自动的)。
Closing tables
正在将表中修改的数据刷新到磁盘中,同时正在关闭已经用完的表。这是一个很快的操作,如果不是这样的话,就应该确认磁盘空间是否已经满了或者磁盘是否正处于重负中。
Connect Out
复制从服务器正在连接主服务器。
Copying to tmp table on disk
由于临时结果集大于tmp_table_size,正在将临时表从内存存储转为磁盘存储以此节省内存。
Creating tmp table
正在创建临时表以存放部分查询结果。
deleting from main table
服务器正在执行多表删除中的第一部分,刚删除第一个表。
deleting from reference tables
服务器正在执行多表删除中的第二部分,正在删除其他表的记录。
Flushing tables
正在执行FLUSH TABLES,等待其他线程关闭数据表。
Killed
发送了一个kill请求给某线程,那么这个线程将会检查kill标志位,同时会放弃下一个kill请求。MySQL会在每次的主循环中检查kill标志位,不过有些情况下该线程可能会过一小段才能死掉。如果该线程程被其他线程锁住了,那么kill请求会在锁释放时马上生效。
Locked
被其他查询锁住了。
Sending data
正在处理Select查询的记录,同时正在把结果发送给客户端。
Sorting for group
正在为GROUP BY做排序。
Sorting for order
正在为ORDER BY做排序。
Opening tables
这个过程应该会很快,除非受到其他因素的干扰。例如,在执Alter TABLE或LOCK TABLE语句行完以前,数据表无法被其他线程打开。正尝试打开一个表。
Removing duplicates
正在执行一个Select DISTINCT方式的查询,但是MySQL无法在前一个阶段优化掉那些重复的记录。因此,MySQL需要再次去掉重复的记录,然后再把结果发送给客户端。
Reopen table
获得了对一个表的锁,但是必须在表结构修改之后才能获得这个锁。已经释放锁,关闭数据表,正尝试重新打开数据表。
Repair by sorting
修复指令正在排序以创建索引。
Repair with keycache
修复指令正在利用索引缓存一个一个地创建新索引。它会比Repair by sorting慢些。
Searching rows for update
正在讲符合条件的记录找出来以备更新。它必须在Update要修改相关的记录之前就完成了。
Sleeping
正在等待客户端发送新请求.
System lock
正在等待取得一个外部的系统锁。如果当前没有运行多个mysqld服务器同时请求同一个表,那么可以通过增加–skip-external-locking参数来禁止外部系统锁。
Upgrading lock
Insert DELAYED正在尝试取得一个锁表以插入新记录。
Updating
正在搜索匹配的记录,并且修改它们。
User Lock
正在等待GET_LOCK()。
Waiting for tables
该线程得到通知,数据表结构已经被修改了,需要重新打开数据表以取得新的结构。然后,为了能的重新打开数据表,必须等到所有其他线程关闭这个表。以下几种情况下会产生这个通知:FLUSH TABLES tbl_name, Alter TABLE, RENAME TABLE, REPAIR TABLE, ANALYZE TABLE,或OPTIMIZE TABLE。
waiting for handler insert
Insert DELAYED已经处理完了所有待处理的插入操作,正在等待新的请求。
大部分状态对应很快的操作,只要有一个线程保持同一个状态好几秒钟,那么可能是有问题发生了,需要检查一下。
在mysql的官方文档中列出了所有可能的状态。
8.14.2 General Thread States
-
After createThis occurs when the thread creates a table (including internal temporary tables), at the end of the function that creates the table. This state is used even if the table could not be created due to some error. -
AnalyzingThe thread is calculating aMyISAMtable key distributions (for example, forANALYZE TABLE). -
checking permissionsThe thread is checking whether the server has the required privileges to execute the statement. -
Checking tableThe thread is performing a table check operation. -
cleaning upThe thread has processed one command and is preparing to free memory and reset certain state variables. -
closing tablesThe thread is flushing the changed table data to disk and closing the used tables. This should be a fast operation. If not, you should verify that you do not have a full disk and that the disk is not in very heavy use. -
converting HEAP to MyISAMThe thread is converting an internal temporary table from aMEMORYtable to an on-diskMyISAMtable. -
copy to tmp tableThe thread is processing anALTER TABLEstatement. This state occurs after the table with the new structure has been created but before rows are copied into it. -
Copying to group tableIf a statement has differentORDER BYandGROUP BYcriteria, the rows are sorted by group and copied to a temporary table. -
Copying to tmp tableThe server is copying to a temporary table in memory. -
Copying to tmp table on diskThe server is copying to a temporary table on disk. The temporary result set has become too large (see Section 8.4.4, “How MySQL Uses Internal Temporary Tables”). Consequently, the thread is changing the temporary table from in-memory to disk-based format to save memory. -
Creating indexThe thread is processingALTER TABLE ... ENABLE KEYSfor aMyISAMtable. Creating sort indexThe thread is processing aSELECTthat is resolved using an internal temporary table.-
creating tableThe thread is creating a table. This includes creation of temporary tables. -
Creating tmp tableThe thread is creating a temporary table in memory or on disk. If the table is created in memory but later is converted to an on-disk table, the state during that operation will beCopying to tmp table on disk. -
deleting from main tableThe server is executing the first part of a multiple-table delete. It is deleting only from the first table, and saving columns and offsets to be used for deleting from the other (reference) tables. -
deleting from reference tablesThe server is executing the second part of a multiple-table delete and deleting the matched rows from the other tables. -
discard_or_import_tablespaceThe thread is processing anALTER TABLE ... DISCARD TABLESPACEorALTER TABLE ... IMPORT TABLESPACEstatement. -
endThis occurs at the end but before the cleanup ofALTER TABLE,CREATE VIEW,DELETE,INSERT,SELECT, orUPDATEstatements. -
executingThe thread has begun executing a statement. -
Execution of init_commandThe thread is executing statements in the value of theinit_commandsystem variable. -
freeing itemsThe thread has executed a command. Some freeing of items done during this state involves the query cache. This state is usually followed bycleaning up. -
Flushing tablesThe thread is executingFLUSH TABLESand is waiting for all threads to close their tables. -
FULLTEXT initializationThe server is preparing to perform a natural-language full-text search. -
initThis occurs before the initialization ofALTER TABLE,DELETE,INSERT,SELECT, orUPDATEstatements. Actions taken by the server in this state include flushing the binary log, theInnoDBlog, and some query cache cleanup operations.For the
endstate, the following operations could be happening:- Removing query cache entries after data in a table is changed
- Writing an event to the binary log
- Freeing memory buffers, including for blobs
-
KilledSomeone has sent aKILLstatement to the thread and it should abort next time it checks the kill flag. The flag is checked in each major loop in MySQL, but in some cases it might still take a short time for the thread to die. If the thread is locked by some other thread, the kill takes effect as soon as the other thread releases its lock. -
LockedThe query is locked by another query. -
logging slow queryThe thread is writing a statement to the slow-query log. -
NULLThis state is used for theSHOW PROCESSLISTstate. -
loginThe initial state for a connection thread until the client has been authenticated successfully. -
Opening tables,Opening tableThe thread is trying to open a table. This is should be very fast procedure, unless something prevents opening. For example, anALTER TABLEor aLOCK TABLEstatement can prevent opening a table until the statement is finished. It is also worth checking that yourtable_cachevalue is large enough. -
optimizingThe server is performing initial optimizations for a query. -
preparingThis state occurs during query optimization. -
Purging old relay logsThe thread is removing unneeded relay log files. -
query endThis state occurs after processing a query but before thefreeing itemsstate. -
Reading from netThe server is reading a packet from the network. -
Removing duplicatesThe query was usingSELECT DISTINCTin such a way that MySQL could not optimize away the distinct operation at an early stage. Because of this, MySQL requires an extra stage to remove all duplicated rows before sending the result to the client. -
removing tmp tableThe thread is removing an internal temporary table after processing aSELECTstatement. This state is not used if no temporary table was created. -
renameThe thread is renaming a table. -
rename result tableThe thread is processing anALTER TABLEstatement, has created the new table, and is renaming it to replace the original table. -
Reopen tablesThe thread got a lock for the table, but noticed after getting the lock that the underlying table structure changed. It has freed the lock, closed the table, and is trying to reopen it. -
Repair by sortingThe repair code is using a sort to create indexes. -
Repair doneThe thread has completed a multi-threaded repair for aMyISAMtable. -
Repair with keycacheThe repair code is using creating keys one by one through the key cache. This is much slower thanRepair by sorting. -
Rolling backThe thread is rolling back a transaction. -
Saving stateForMyISAMtable operations such as repair or analysis, the thread is saving the new table state to the.MYIfile header. State includes information such as number of rows, theAUTO_INCREMENTcounter, and key distributions. -
Searching rows for updateThe thread is doing a first phase to find all matching rows before updating them. This has to be done if theUPDATEis changing the index that is used to find the involved rows. Sending dataThe thread is reading and processing rows for aSELECTstatement, and sending data to the client. Because operations occurring during this this state tend to perform large amounts of disk access (reads), it is often the longest-running state over the lifetime of a given query.-
setupThe thread is beginning anALTER TABLEoperation. -
Sorting for groupThe thread is doing a sort to satisfy aGROUP BY. -
Sorting for orderThe thread is doing a sort to satisfy aORDER BY. -
Sorting indexThe thread is sorting index pages for more efficient access during aMyISAMtable optimization operation. -
Sorting resultFor aSELECTstatement, this is similar toCreating sort index, but for nontemporary tables. -
statisticsThe server is calculating statistics to develop a query execution plan. If a thread is in this state for a long time, the server is probably disk-bound performing other work. -
System lockThe thread is going to request or is waiting for an internal or external system lock for the table. If this state is being caused by requests for external locks and you are not using multiple mysqld servers that are accessing the sameMyISAMtables, you can disable external system locks with the--skip-external-lockingoption. However, external locking is disabled by default, so it is likely that this option will have no effect. ForSHOW PROFILE, this state means the thread is requesting the lock (not waiting for it). -
Table lockThe next thread state afterSystem lock. The thread has acquired an external lock and is going to request an internal table lock. -
updateThe thread is getting ready to start updating the table. -
UpdatingThe thread is searching for rows to update and is updating them. -
updating main tableThe server is executing the first part of a multiple-table update. It is updating only the first table, and saving columns and offsets to be used for updating the other (reference) tables. -
updating reference tablesThe server is executing the second part of a multiple-table update and updating the matched rows from the other tables. -
User lockThe thread is going to request or is waiting for an advisory lock requested with aGET_LOCK()call. ForSHOW PROFILE, this state means the thread is requesting the lock (not waiting for it). -
Waiting for release of readlockThe thread is waiting for a global read lock obtained by another thread (withFLUSH TABLES WITH READ LOCK) to be released. -
Waiting for tables,Waiting for tableThe thread got a notification that the underlying structure for a table has changed and it needs to reopen the table to get the new structure. However, to reopen the table, it must wait until all other threads have closed the table in question.This notification takes place if another thread has used
FLUSH TABLESor one of the following statements on the table in question:FLUSH TABLES,tbl_nameALTER TABLE,RENAME TABLE,REPAIR TABLE,ANALYZE TABLE, orOPTIMIZE TABLE. -
Waiting on condA generic state in which the thread is waiting for a condition to become true. No specific state information is available. -
Waiting to get readlockThe thread has issued aFLUSH TABLES WITH READ LOCKstatement to obtain a global read lock and is waiting to obtain the lock. -
Writing to netThe server is writing a packet to the network.
[root@ucjmh ~]# cat kill_lock.sql
kill 43;
kill 55;
[root@ucjmh ~]# cat locked.txt
43 root localhost hi_db Query 3825 Waiting for table metadata lock insert into t values(4)
55 root localhost NULL Query 0 NULL show processlist
[root@ucjmh ~]# cat ger_lock.sh
#!/bin/bash
rm -rf locked.txt
rm -rf kill_lock.sql
mysql -uroot -poracle -e “show processlist”|grep -i “Query” >> locked.txt;
for line in $(awk ‘{printf $1″\n”}’ locked.txt)
do
echo “kill ${line};”>>kill_lock.sql
done
MySQL隐式转换
mysql> create table users(num int not null, id varchar(30) not null, password varchar(30) not null, primary key(num));
Query OK, 0 rows affected (0.00 sec)
mysql> insert into users values(1, ‘admin’, ‘ad1234’);
Query OK, 1 row affected (0.00 sec)
mysql> insert into users values(2, ‘wh1ant’, ‘wh1234’);
Query OK, 1 row affected (0.00 sec)
mysql> insert into users values(3, ‘secuholic’, ‘se1234’);
Query OK, 1 row affected (0.00 sec)
mysql> select * from users where id=0;
+—–+———–+———-+
| num | id | password |
+—–+———–+———-+
| 1 | admin | ad1234 |
| 2 | wh1ant | wh1234 |
| 3 | secuholic | se1234 |
+—–+———–+———-+
3 rows in set, 3 warnings (0.00 sec)
mysql> show warnings
-> ;
+———+——+———————————————–+
| Level | Code | Message |
+———+——+———————————————–+
| Warning | 1292 | Truncated incorrect DOUBLE value: ‘admin’ |
| Warning | 1292 | Truncated incorrect DOUBLE value: ‘wh1ant’ |
| Warning | 1292 | Truncated incorrect DOUBLE value: ‘secuholic’ |
+———+——+———————————————–+
3 rows in set (0.00 sec)
mysql> select * from users where id=’0′;
Empty set (0.00 sec)
mysql> select * from users where 0=id;
+—–+———–+———-+
| num | id | password |
+—–+———–+———-+
| 1 | admin | ad1234 |
| 2 | wh1ant | wh1234 |
| 3 | secuholic | se1234 |
+—–+———–+———-+
3 rows in set, 3 warnings (0.00 sec)
mysql> insert into users values(‘ucjmh’,’ucjmh’,’ucjmh’);
Query OK, 1 row affected, 1 warning (0.00 sec)
mysql> show warnings;
+———+——+————————————————————+
| Level | Code | Message |
+———+——+————————————————————+
| Warning | 1366 | Incorrect integer value: ‘ucjmh’ for column ‘num’ at row 1 |
+———+——+————————————————————+
1 row in set (0.00 sec)
mysql> select * from users;
+—–+———–+———-+
| num | id | password |
+—–+———–+———-+
| 0 | ucjmh | ucjmh |
| 1 | admin | ad1234 |
| 2 | wh1ant | wh1234 |
| 3 | secuholic | se1234 |
+—–+———–+———-+
4 rows in set (0.00 sec)
如果是在oracle中直接会报ora-01722